
Добавить бота tupperbox в дискорд
A bot dedicated to replacing user messages to emulate having multiple accounts. Great for plural users and roleplay.
Visit the official Tupperbox website for more info and an online user guide!
Tupperbox allows you the convenience of having multiple accounts with different names and avatars without any of the hassle of logging out and in to each of them.
These "accounts" made with the bot are termed "tuppers" by default and the act of sending a message through a tupper is called "proxying". You can set any prefix and suffix (together termed "brackets") to proxy with a tupper.
Proxied messages are sent via webhooks and show up with a "Bot" tag, which obscures who originally sent the message - but Tupperbox does not provide any anonymity by default. Any user can easily react to the proxied message with a ❓ to see who originally sent it.
Tupperbox has found widespread usage in several communities that benefit greatly from these pseudo-accounts, such as plural communities and roleplay servers.
It is successful in these communities because they benefit greatly from being able to send messages under various different 'identities' on the fly, whether that's to represent another person speaking with the account or a character's line of dialogue in a roleplay.
It comes with many moderator tools to prevent abuse as well as an active support community in our support server, you can register as many tuppers as you want, and organize them with groups, individual tags and descriptions, and other fun details.
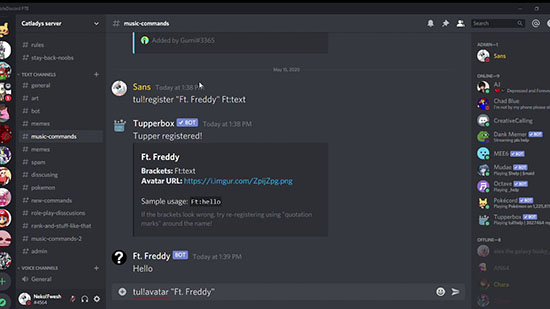
Like any bot, the help command is the best way to learn how to use it, and can be executed by typing tul!help . However, there is a slight learning curve in using the bot, but getting started is very easy. The most basic function of the bot is the proxy function, which is demonstrated below:

Above, I registered a new tupper and then sent the message >>Hello! which was detected, deleted, and replaced with a message that appears to be sent by my newly registered tupper. The brackets ( >>text in the example) represent a pattern that Tupperbox looks for in order to activate that tupper. Simply replace the text in the brackets with what you want the tupper to say, and Tupperbox will recognize the surrounding symbols as an instruction to send the message with your registered tupper.
After registering a tupper, you can edit its info with commands such as tul!avatar , tul!brackets , tul!describe , tul!rename , and tul!nick , or remove it any time with tul!remove . Refer to the bot's help command for usage details.
Advanced Usage
React to a proxy you sent with ❌ to delete it or 📝 to edit it.
Manage your tupper groups and who belongs to which with the tul!group command.
Manage server-specific configuration using tul!cfg . For example, to instruct Tupperbox to disallow a specific role from proxying (using tuppers), you might use tul!cfg deny proxies @role . You can change Tupperbox's prefix with tul!cfg prefix . If your server leans towards a specific usage of Tupperbox, you can instruct Tupperbox to call "tuppers" something else such as "characters" or "headmates" using tul!cfg rename .
If you find yourself mainly using the same tupper a lot in a particular server or channel, check out the tul!auto command to configure Tupperbox to automatically use that tupper without having to type its brackets.
If you find that Tupperbox is conflicting with another bot that serves a similar purpose (such as PluralKit or Jinkaku) you can use tul!proxy disable to turn it off in a server or particular channels.
View yours or another user's tuppers with the command tul!list .
If you ever wonder who sent a tupper message (since you can't easily tell at first glance), you can reply to the message with tul!showuser or react to it with ❓ to reveal who sent it.
You can control your data with the commands tul!export , tul!import , and tul!purge . Tupperbox data may be compatible with other bots that serve a similar purpose, such as PluralKit.
Tupperbox is a bot that allows you to send messages that look like they came from other profiles.
Getting started is easy - you just need to know how to make a tupper and how to send a proxy.
Making a Tupper
A "tupper" is the default name for one of these profiles that you can send messages from.
There are two basic ways of making a new tupper:
- The dashboard (recommended)
- The tul!register command via the bot on Discord
Whichever one you use, you need two things: A name and some brackets.
The name can be anything - in this example, we'll use the name "Snee", the name of one of my tuppers demonstrated above.
The "brackets" are a special command that you use to summon your tupper. Example brackets are [text] , or guy:text -- you can even use emojis. Anything you'd like.
The word "text" is required because it's a placeholder for any message you'll be sending; it tells Tupperbox "if I type these brackets, then my tupper will appear".
If that's confusing, just keep reading - in this example, we'll use the brackets snee:text .
Dashboard
To make a tupper via the dashboard, visit this link and log in with Discord. Then, once you can see your list of tuppers, click the plus in the top right and choose "Add Tupper". Set a name and brackets for your tupper and then click "Save Changes". Take a look at the image below for a visual example.

Discord
To make a tupper via Tupperbox's commands on Discord -- in an available channel or in DMs -- you'll need to use tul!register .
For example, this will make the same tupper as shown above: tul!register Snee snee:text
Sending a Proxy
Once you have a tupper, you can send a proxy. A proxy is Tupperbox slang for "a message proxied through Tupperbox" - in other words, a message sent by a tupper.
If you haven't already done so, join a server with Tupperbox or add it to one of your own. In any channel Tupperbox has access to, you can now send a proxy.
Proxying is easy:
- Look at your tupper's brackets. They will look something like guy: text or .
- Write your brackets in a message, but replace the word "text" with what you want your tupper to say. For example, if your brackets are guy: text , you can make your tupper say "Hello!" by sending this message: guy: Hello! .
Setting an Avatar
Most people will want a more expressive avatar than the default Discord one. Tupperbox has you covered!
There are three main ways to set an avatar for your tupper:
- The dashboard (recommended)
- The tul!avatar command via the bot on Discord
- Uploading an image while using the tul!register command to create a tupper
The easiest way is to upload an image on the dashboard. This feature is Premium only. Simply visit the dashboard, select your tupper, and click its avatar or the upload button. Alternatively, you can simply paste an image link in the "Avatar URL" field on your tupper.
You can either provide an image link, like above, or upload the image while running the command instead of giving a link.
Finally, you can also upload an image while making a tupper with tul!register .
Limitations
There are two common pitfalls when working with tupper avatars.
The first is choosing an image that's too large. Discord has certain size limits for webhook avatars that depend on a variety of factors. The safest thing to do is to try and choose an image with a resolution of about 500x500 and under 500kb in filesize.
The second is the image getting deleted. If you uploaded the image to Discord, and the message was deleted (or the channel, or the server), Discord will no longer host the image. It will be deleted off of Discord's servers, and Tupperbox can no longer serve it.
Tupperbox Premium users have all of their avatars backed up and resized, so that you no longer need to worry about either of these pitfalls.
Tupperbox lets you have many different profiles ("Tuppers") which you can choose between easily with every message you send!
- Immersive roleplay as your favorite characters!
- For plural users, let your headmates express themselves naturally!
- Play out scenarios as your DnD characters!
- Express your creativity by acting out scenes or making instant memes!
Create and edit Tuppers
A tupper is a fake Discord profile you can send messages through, as long as Tupperbox also has access to that channel.
You pick a tupper to use by writing its "brackets" around your message. It's useful to think of the brackets as a special prefix for your tupper.
Tupper features
- Change your tuppers' names or avatars
- Add nicknames and tags to customize your tuppers' names
- Organize tuppers into groups
- Import tuppers from compatible bots like PluralKit
Web Dashboard
Manage your tuppers and groups with the new online dashboard!
- Reorder tuppers and groups
- Remove multiple tuppers
- Edit tupper and group info
Proxy Features
A proxy is a message sent through a tupper. You can interact with these messages through various reactions.
- React with ❌ to a proxy you've sent to delete it!
- React with ❓ to a proxy to show who sent it in DM!
- React with 📝 to edit a proxy you've sent!
Autoproxy
Set a tupper to autoproxy and every regular message you send will be from that tupper!
- Use "sticky mode" to autoproxy as the last tupper used!
- Turn on autoproxy in a specific server or even channel
- Start a message with \ to disable autoproxy for that message
- Start a message with \\ to clear a stickied tupper until next proxy

Logging
Set a log channel to have Tupperbox copy all proxied messages to it.
Ideal for moderators to quickly check what a user has said as a particular tupper. Works with Discord search bar!
A bot dedicated to replacing user messages to emulate having multiple accounts. Great for plural users and roleplay.
Visit the official Tupperbox website for more info and an online user guide!
Tupperbox allows you the convenience of having multiple accounts with different names and avatars without any of the hassle of logging out and in to each of them.
These "accounts" made with the bot are termed "tuppers" by default and the act of sending a message through a tupper is called "proxying". You can set any prefix and suffix (together termed "brackets") to proxy with a tupper.
Proxied messages are sent via webhooks and show up with a "Bot" tag, which obscures who originally sent the message - but Tupperbox does not provide any anonymity by default. Any user can easily react to the proxied message with a ❓ to see who originally sent it.
Tupperbox has found widespread usage in several communities that benefit greatly from these pseudo-accounts, such as plural communities and roleplay servers.
It is successful in these communities because they benefit greatly from being able to send messages under various different 'identities' on the fly, whether that's to represent another person speaking with the account or a character's line of dialogue in a roleplay.
It comes with many moderator tools to prevent abuse as well as an active support community in our support server, you can register as many tuppers as you want, and organize them with groups, individual tags and descriptions, and other fun details.
Like any bot, the help command is the best way to learn how to use it, and can be executed by typing tul!help . However, there is a slight learning curve in using the bot, but getting started is very easy. The most basic function of the bot is the proxy function, which is demonstrated below:
Above, I registered a new tupper and then sent the message >>Hello! which was detected, deleted, and replaced with a message that appears to be sent by my newly registered tupper. The brackets ( >>text in the example) represent a pattern that Tupperbox looks for in order to activate that tupper. Simply replace the text in the brackets with what you want the tupper to say, and Tupperbox will recognize the surrounding symbols as an instruction to send the message with your registered tupper.
After registering a tupper, you can edit its info with commands such as tul!avatar , tul!brackets , tul!describe , tul!rename , and tul!nick , or remove it any time with tul!remove . Refer to the bot's help command for usage details.
Advanced Usage
React to a proxy you sent with ❌ to delete it or 📝 to edit it.
Manage your tupper groups and who belongs to which with the tul!group command.
Manage server-specific configuration using tul!cfg . For example, to instruct Tupperbox to disallow a specific role from proxying (using tuppers), you might use tul!cfg deny proxies @role . You can change Tupperbox's prefix with tul!cfg prefix . If your server leans towards a specific usage of Tupperbox, you can instruct Tupperbox to call "tuppers" something else such as "characters" or "headmates" using tul!cfg rename .
If you find yourself mainly using the same tupper a lot in a particular server or channel, check out the tul!auto command to configure Tupperbox to automatically use that tupper without having to type its brackets.
If you find that Tupperbox is conflicting with another bot that serves a similar purpose (such as PluralKit or Jinkaku) you can use tul!proxy disable to turn it off in a server or particular channels.
View yours or another user's tuppers with the command tul!list .
If you ever wonder who sent a tupper message (since you can't easily tell at first glance), you can reply to the message with tul!showuser or react to it with ❓ to reveal who sent it.
You can control your data with the commands tul!export , tul!import , and tul!purge . Tupperbox data may be compatible with other bots that serve a similar purpose, such as PluralKit.
Специально разработанный Tupperbox bot для Discord обладает широким функционалом. Чтобы правильно настроить бота и исключить технические сбои, требуется придерживаться четкой инструкции и знать об имеющихся особенностях.
Главные функции и возможности

Как скачать и добавить бота
Загрузить и установить бота несложно даже неопытным пользователям программного обеспечения. Стандартная последовательность действий от разработчиков предусматривает соблюдение следующей инструкции:
Сразу после этого пользователь осуществляется перенаправление в личный кабинет программного обеспечения Дискорд. Авторизация выполняется путем ввода ранее предоставленного логина и пароля. Обратите внимание, при утрате идентификатора, требуется нажать на клавишу восстановления «Забыли пароль?». После этого пользователю предстоит придерживаться имеющимся подсказкам.
- На следующем этапе требуется в панели управления нажать на графическое изображение шестеренки, чтобы инициировать переход в категорию внесения настроек.
- После этого пользователю требуется выбрать подраздел с ранее созданными тематическими серверами.
Далее требуется перейти в следующую вкладку для дальнейшего выбора канала, в который необходимо пригласить специализированного рассматриваемого бота. - Во вновь открывшейся форме подтверждаются намерения путем нажатия на одноименную клавишу приглашения.
- На завершающем этапе требуется сохранить внесенные результаты нажатием на одноименную клавишу Save.
- Чтобы изменения вступили в силу, важно не забывать перезагружать программное обеспечение Дискорд.
Обратите внимание, для исключения вероятности возникновения технических сбоев, пользователям рекомендуется пользоваться стационарным компьютером. Для внесения персональных параметров работы, можно пользоваться после добавления функции любым устройством, к примеру, планшетом либо мобильным телефоном.
Настройка бота и отключение
Внести изменения в процесс функционирования бота можно придерживаясь четкой последовательности действий. Отзывы пользователей указывают на отсутствие сложностей. Исчерпывающая инструкция подразумевает под собой:

Разработчики рекомендуют перезагрузить мессенджер Дискорд, чтобы внесенные ранее изменения вступили в силу. Иначе не гарантируется отсутствие технических сбоев.
Команды управления ботом
Управление рассматриваемым ботом исключает вероятность допущения ошибок с вытекающими последствиями. Ознакомиться с ними можно путем ввода !HELP. После этого на экране монитора отображается исчерпывающая информация. Рекомендуется новым пользователям бота изучить команды, чтобы исключить обращение в службу поддержки для профессиональной консультации.
Читайте также: