Crossfade fl studio что это
We hope you love the products we recommend. We may collect a small commission if you purchase through one of our links. This will not cost you anything extra. Thank you if you do. As an Amazon Associate, I earn from qualifying purchases.
Crossfading in FL Studio can be achieved in two different ways. You can either create a fade using the crossfade declicking mode in the sampler window. Alternatively, you can create volume automation of both sounds and make your crossfades manually.
Using Crossfades In FL Studio
Creating crossfades can be a great way of seamlessly moving from one sample to another and is a good way to ensure no pops or clicks when a new sample comes in.
Crossfades are used in many modern productions and are essential for any music producer.
In this FL Studio tutorial, we will look at the two main ways you can create crossfades.
Firstly we will look at how you can use the crossfade declicking mode to create crossfades automatically. After that, we will look at creating fades using volume automation clips.
Using Declicking Mode
When wanting to crossfade between two different audio clips in FL Studio, you can use the Declicking mode feature in the sampler window.
To open the sampler window, simply click on the small waveform icon at the top left of the audio clip in the playlist view. Within the sampler window, you will see a section titled ‘Content,’ and within this section, you will see an option called ‘Declicking mode.’
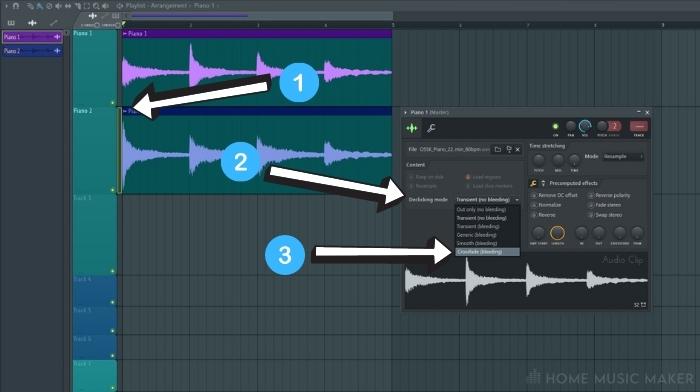
When you click on the drop-down menu to the left, you will see that you have a range of different options. At the bottom of this list, you will see a crossfade option.
Apply this crossfade mode to both samples you are looking to crossfade between. When you put them together, you will hear that they seamlessly blend into each other.
Using Volume Automation
We will now look at a method that allows you to have more control over the cross fade parameters, but that takes slightly longer to set up.
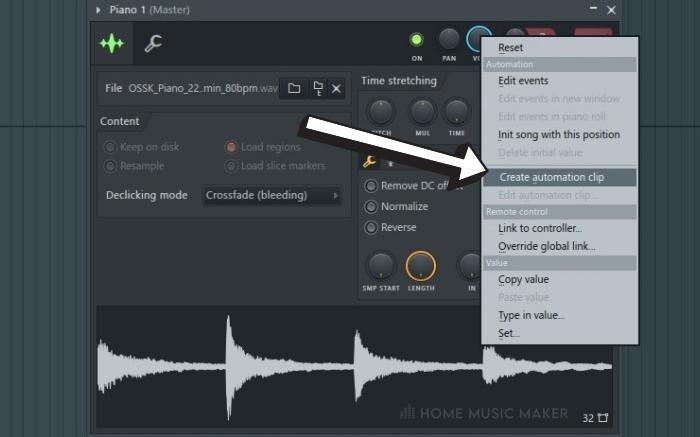
To begin with, you will want to create a volume automation clip of the two samples you want to crossfade between. You can do this with either the volume knob in the sampler or with the mixer track fader.
Right-click on the volume parameter of choice and select the ‘Create automation clip’ option. You will notice that this creates a new automation clip of that parameter in the playlist view.
Now that you have a volume automation clip of each, you can create the volume curves for each one so that they switch over simultaneously. Right-click to create new points in the automation and left-click drag to move their location.
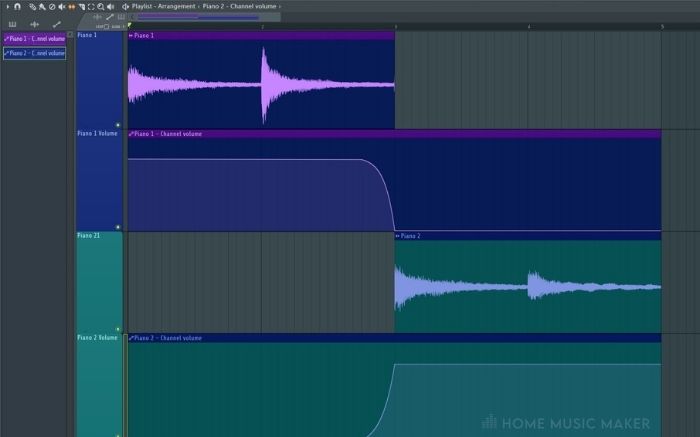
Unlike the previous method, you can change how long the crossfade lasts with more control using this technique.
Related Questions
Why Is Crossfading so Important?
Crossfading is a great way to bring in new elements to a song or to create a smooth transition from one to another seamlessly. If you were not to use crossfading, some aspects of your music production might appear too suddenly.
Why Are There Different Declicking Modes?
In FL Studio, the declicking modes refer to different use cases. For example, the crossfade mode is designed to be used primarily as a long fade to allow elements to come in slowly.
Transient mode is suitable if you are using a drum sample or something with a lot of transient attack at the start. This ensures this stays intact at the beginning of the sample.
Should I Always Use Crossfading?
There are times when you may not feel like you need to use crossfading, and this is completely fine. Some elements may not need to come in gently, and some may benefit from coming in suddenly rather than slowly.
It is best to experiment with different effects to begin with, and after a while, you will know which sounds might require a crossfade and which will sound fine without one.
Are There Any Downsides to Crossfading Using Declicking Mode?
You may find that using crossfades takes away some energy from a sample if it comes in quickly. You may even find that the crossfade declicking mode is too short for what you are looking for.
In this case, I would recommend using the volume automation method to achieve your crossfade instead. Using this method allows you to control how long the crossfade takes.
Why Does My Crossfade Not Sound Right?
You may have issues with the crossfade if you have not got the correct duration, as this will either mean that your sound takes too long to come in or come in too quickly.
To remedy this, you either try using the volume automation technique or a different parameter for the automation, such as a filter sweep or reverb effect wet/dry.
Should You Fade Your Entire Song at The Start and End?
Fading a song in and out at the start is usually a good idea, as it ensures that there are no pops or clicks, which can appear as an artifact in some exports.
It is best practice to do this at the very end of your song’s production cycle, once you have mixed and mastered it.
Why Should I Use the Automation Clip Technique to Crossfade?
Using the automation clip technique is a great way to have the most control over how your fade sounds.
With automation clips, you can choose how long it lasts and the intensity at any given point, allowing users to create their volume curves.
Final Words
You now know how to create crossfades with two different methods in Fruity Loops Studio. Knowing how to do this is a great way to give your productions a more polished sound. It will eliminate unwanted clips and pops and create nicer transitions when bringing in a new audio file.
Using the automation clip method, you can also get creative with the parameter you choose to crossfade with. For example, you could try filter sweeps or reverb wet/dry for some more interesting results!
В предыдущей статье мы с вами рассматривали Fade in и Fade out . Помимо этих двух функций существует ещё один удобный способ формирования амплитудной огибающей, такой как Кроссфейд (Crossfade). Для чего он нужен и разберемся в этой статье. Также рассмотрим очень популярный эффект в современной музыке или то, как можно изменить временнóе направление звука.
Совет: перед тем как прочитать эту статью, рекомендуем ознакомиться с понятиями Fade in и Fade out, а также узнать о амплитудной огибающей сигнала ( читать ).
Кроссфейд (Crossfade)
Кроссфейд сочетает в себе функции как Fade in, так и Fade out. При пересечение «внахлест» двух аудиообъектов можно образовать область, в которой в первом объекте уровень звука будет затухать, а во втором наоборот возрастать — кроссфейд. В итоге пересекающееся аудиособщения будут плавно переходить одно в другое. Причем время за которое будет происходить этот переход может быть как пару секунд, так и несколько минут.
В каждом музыкальном аудиоредакторе имеется своё меню формирования кроссфейдов. Например, в программе Cubase оно выглядит вот так:
Также отметим, что существуют как симметричные, так и ассиметричные кроссфейды. Симметричные можно увидеть на рисунках выше. А ассиметричный выглядит, например, вот так:
Reverse (backward)
Сначала давайте послушаем этот эффект на примере:
Послушав, вы уже поняли, что эта функция позволяет изменить, а точнее переписать исходный аудиофайл в обратном направлении, то есть поменять местами его начало и конец. В первом примере, это вначале был простой звук тарелки, а во втором фортепиано.
В аудиоредакторах подобная обработка реализуется очень просто и без сторонних плагинов. Обычно в меню аудио → обработки, есть название reverse или backward. Нужно сначала выделить нужный аудиофайл, а затем применить эту обработку. Вот и всё!
Дальше будет ещё много чего-интересного о звуке и его обработке.
Похожие записи
Таблица преобразования BPM в Delay
Большинство современных плагинов и аппаратных устройств позволяют устанавливать автоматически задержку (delay) в соответствие с темпом BPM вашего проекта. Но если…
Distortion (Дисторшн, дистошн).
Что такое эффект — distortion? Принцип действия эффекта, применение в проектах, известные исполнители, использующие данный эффект, цифровые и аналоговые устройства…
Phase meters (Фазометры)
Фазометр — полезный прибор для проверки аудиоматериала. Зачем нужен и в каких случаях его употребляют?
Частоты, рекомендуемые для эквализации
Полезно изучать звучание инструментов и быстро находить, эквализировать проблемные области при сведении трека. В этой статье публикуется материал от звукорежиссёра…
Пять легендарных педалей delay, с которыми вы не ошибетесь.
Сейчас на рынке так много отличных устройств задержки, что можно легко потеряться в несметном количестве вариантов. Поэтому мы в New Style…
Сегодня в любом даже самом простом компьютерном аудиоредакторе есть функции Fade In и Fade Out. Они позволяют очень быстро и наглядно управлять атаками и затуханиями звуков. Как же формировать амплитудную огибающую с их помощью? Рассмотрим этот вопрос.
Вначале, вкратце поясним, что такое амплитудная огибающая ( ADSR ) — это очень важная характеристика звука, позволяющая нам идентифицировать сам музыкальный инструмент, то есть отличить один звук от другого. Выделяют несколько участков огибающей: Атака (Attack), Спад (Decay), Поддержка (Sustain), Затухание (Release).

Fade In и Fade Out позволяют нам управлять крайними участками амплитудной огибающей: Атака (Attack) и Затухание (Release).
Fade In
Отвечает за возрастание громкости сигнала. В приведённом примере, ниже аудиофайла вы видите меню, где можно сформировать различные формы нарастания звука.

Замечание: пример взят из виртуальной звуковой студии Cubase Steinberg. В каждом аудиоредакторе фейды немного отличаются, но принцип работы с ними по существу везде одинаков. Также в каждой программе есть меню фейдов, где можно выбрать нужный пресет или самому нарисовать Fade in или Fade out.
Fade Out
Отвечает за затухания сигнала . Также как и в случае Fade in, можно выбрать различные варианты фейдов. Или как на рисунке ниже нарисовать мышкой свою амплитудную огибающую затухания звука.

Как видите, Вы можете создавать очень сложные формы огибающих, сохранять их как шаблон и загружать в любой проект, а также сделать понравившееся настройки по-умолчанию или применить их к нескольким или ко всем вновь загружаемым файлам. Вариантов много.
Но что делать если необходимо сформировать амплитудную огибающую по середине объекта?
В этом случае можно растянуть длину Fade In или Fade Out на нужную длину (хоть на весь аудиофайл) и отредактировать огибающую. Но помните, что Fade In имеет вначале всегда нулевое значение, а заканчивается максимальным. Аналогично и Fade Out: в начале максимум, в конце нулевое значение.
Однако, есть ещё более простой способ. Но о нём мы поговорим в следующей статье.
Для чего нужны фейды:
- Как мы уже упоминали, для того, чтобы управлять атаками и затуханиями звуков. Формировать амплитудную огибающую.
- Убрать резкие перепады, чтобы избежать нежелательных щелчков.
The Channel Sampler is an integrated, single-sample, sampler instrument useful for percussion and related one-shot sounds. To load a sample drag and drop the sample from the Browser or Windows Explorer onto Channel Rack. If you drop the sample on the Playlist you will create an Audio Clip, a related, but different instrument type.

NOTES:
- ADSR & Filtering - Channel Samplers have a number of useful controls under the Channel Settings Tab controls that include the integrated ADSR vol, pan, filter, pitch & LFO envelopes. For example, samples will continue to play after note release unless you activate the Volume envelope.
- Disabled options - You may notice that some of the options in your Sampler Channels are disabled (grayed out), however you can still toggle the switches on/off. This improves workflow when trying out different samples in the same Sampler Channel, so that if a selected option becomes possible it will become activated automatically.
Load and locate samples. Clicking on the sample name will open a File Explorer to the location of the currently loaded sample. Use the icons to the right to:
| Load sample file - Opens a file explorer window. Right-Click - To open the history of samples loaded. | |
| Locate sample in browser - Opens the Browser to the location where the sample is saved. | |
| Remove sample - This only removes sample from the selected Sampler Channel, it does not delete the original sample data file. |
Content
-
Keep on Disk - For FL Studio 32 Bit this can be used to free virtual memory allocation allowing more and/or larger Audio Clips / Sampler Channels to be used in the project. Sample data is moved from FL Studio's virtual memory allocation to a separate memory allocation. For FL Studio 32 & 64 Bit - It can significantly speed load times for multi-GB projects. When 'Keep on disk' is selected the maximum memory available to each Audio Clip / Sampler Channel will be 2 GB. Your Windows OS version (32 or 64 Bit) and installed RAM will determine how smoothly your sample playback works (if you load more samples than you have RAM then disk-swapping may cause buffer underruns as the data is read off disk).
- Samples must be in 16 or 32-Bit .wav format. Keep on disk won't work with compressed formats such as .ogg or .mp3, otherwise the option will be grayed out.
- Automatically 'Keep on disk' with the 'Auto keep long audio on disk' on the F10 General Options, then re-load your project.
- 'Keep on disk' precludes the use of precomputed effects, that require the whole sample is loaded in memory.
- For smooth operation without underruns or glitches, your physical RAM should (at least) match the project's total sample-space demand. It may also take a while for very large projects to load so be patient. TIP: Zoom out on the Playlist, ( Ctrl + Right-Click ) on a blank area, so all Audio Clips are visible in their entirety prior to pressing Play for the first time. This forces Audio Clip data to be cached into RAM.
Playback
- Start Offset - Offsets the sample start point relative to the start of the sample data (automatable). There is also a 'Sample Start' on the Precomputed tab that trims the sample data to create the new start point. NOTE: The Declicking options work with Start Offset to remove unwanted clicks when non-zero, sample data start points are used.
- Use loop points - Select this option to make the sample loop, when the sample contains loop points (see Sample view below). The play position starts at the sample beginning and when it reaches the loop-end point, jumps back to the loop-start point and repeats this process while the note is held. NOTE: The Precomputed Processes allows you to create a Crossfade Loop.
- Ping pong loop - The play-position bounces back and forth between the loop start and loop end points (forwards then backwards through the loop region).
Declicking
These options help to remove 'clicks' at the start (in) or end (out) caused by sharp level discontinuities when you slice Audio Clips. That is, where the sample starts or ends with a value significantly different from another sample in close proximity, the sudden jump from one value to the next causes a 'click'. The default setting is 'Out only' (10 ms fade), this will not cause audible artifacts. Set by ear.
- Out only (no bleeding) - No in-declicking, declicking-out is a 10ms (cosine S-shaped) fade-out.
- Transient (no bleeding) - Useful for drum samples as the attack transient is fully preserved (only the first few samples are ramped). The declick-out uses a no-bleeding, short (10ms), filtering fade-out.
- Transient (bleeding) - Same attack processing as above, with a declick-out based on a 20 ms (cosine S-shaped) fade-out.
- Generic (bleeding) - A 20ms cosine S-shaped fade-in and fade-out.
- Smooth (bleeding) - A 100ms cosine S-shaped fade-in and fade-out.
- Crossfade (bleeding) - A 200 ms attack/release that is designed to crossfade contiguous (touching) Audio clips. This is not a true crossfade, where clips overlap, the fade start and end is designed to work well with another clip with the same settings butted up against it. NOTE: Both Audio Clips need to have been sliced to use this setting, as data before and after the slice points is used to create the Crossfade.
Time stretching / Pitch shifting
The Time stretching / Pitch shifting algorithms can synchronize pitch and/or tempo with your project, since pitch and playback speed can be adjusted independently. These are the same algorithms used by the Edison Time Stretch / Pitch Shift tool. There are off-line (computed then applied) and realtime (computed on-the-fly) stretching options. Off-line provides the highest quality but can't be used with Tempo changes. See a video here.
Video Tutorial
Options
- PITCH (Pitch Shift) - Change sample pitch while preserving its length. If the 'resample' method is selected it will be automatically changed to 'Auto' after tweaking this knob.
- MUL (Time Multiplier) - Use this knob to modify the sample length. For example, you can quickly stretch the sample to twice its original length without needing to modify the Time setting.
- TIME (Sample Duration) - The time it takes to play the sample from start to end. Depending on the Stretch Mode, the consequences of adjusting 'Time' will be different. NOTE: To maintain a constant pitch as Project Tempo is automated, use Mode (menu) > Realtime > Stretch.
- Resample - Standard pitch shifting that varies sample length with sample pitch. When the 'TIME' knob is set to anything other than '(none)', for example locked to Project Tempo, shown above, this option behaves like a tape or record, where pitch changes with play-speed. Audio Clips - Will change pitch as Project Tempo is changed or Clip length physically stretched. Piano roll - If you play a chord, each note will play back at a different speed according to the pitch of the note.
- Stretch - Vocals and other rhythmic samples stay in-key and in-time as the project tempo is automated AND OR maintain the original sample duration when playing a MIDI keyboard / changing pitch in the Piano roll. For example, 'Stretch' will allow you to play a chord and keep all voices in-sync. 'Stretch' works for both Audio Clips and Sampler Channels. NOTE: When 'Stretch' is selected for the first time, the TIME knob (sample duration) is locked to the current Tempo. To default TIME to a new tempo: Right-Click the TIME knob and select 'Project tempo'.
- Stretch pro - Enhanced version of 'Stretch' with Formant control:
- F.Shift (Formant Shift) - Formants are peaks in the frequency spectrum caused by resonances, natural frequencies of vibration, of an instrument. See here for a full explanation. NOTE: Automating the Formant is a great way to add some motion and interest to sampled sounds.
- e3 Generic - A 'Default' mode is designed to work with the widest range of input signals. As usual, experiment with other methods if you hear unwanted artifacts.
- e3 Mono - Specialized for monophonic input signals such as vocals or solo instruments. Uses automatic formant preservation techniques.
Special - These options are designed to work with percussion, specifically to preserve attack transients. The important 'click', 'thwack' and 'tshhhh' sounds that start most percussion samples.
- Slice stretch - Use for drum loops, that include slice markers aligned with the drum hits, that have a tempo lower or equal to the project. Slice markers are used for transient preservation and each slice is stretched according to e3 Default. NOTES: Use Slicex for more advanced loop slicing and processing options. If your samples already contain Slices or Regions and 'Load Regions' / 'Slice Markers' is selected. These will be used to stretch the sample and preserve transients. The markers are assumed to be on the beat. Otherwise FL Studio will perform an on-the-fly analysis. This may be more or less accurate depending on the slice data contained in the sample (sometimes samples contain unhelpful slice or region data).
- Slice map - Use for drum loops, that include slice markers aligned with the drum hits, that have a tempo higher or equal to the project tempo. Slices are moved (unstretched) to map to the positions each slice would play at the selected pitch/tempo NOTES: Use Slicex for more advanced loop processing options. If your samples already contain Slices or Regions and 'Load Regions' / 'Slice Markers' is selected. This data will be used to stretch the sample and preserve transients. The markers are assumed to be on the beat. Otherwise FL Studio will perform an on-the-fly analysis. This may be more or less accurate depending on the slice data contained in the sample (sometimes samples contain unhelpful slice or region data).
- Auto - Selects the best stretch algorithm in light of the other options and settings you have selected. You trust us don't you?
- e2 Generic (Pro default & Pro transient) - Older version of e3 Generic.
- e2 Transient (Transient & Tonal) - Transient and formant preserving stretch method.
- e2 Mono (Monophonic) - Older version of e3 Mono.
- e2 Speech (Speech) - Optimized for spoken words. For singing, use the 'e3 or e2 Mono' mode).
Working with the stretch/pitch functions
To perform dynamic tempo changes during the song (tempo automation), use Time stretching > Mode > Stretch to keep samples in sync (otherwise with Resample, pitch and duration will change with tempo). See a video here. Alternatively for a more creative option try Fruity Granulizer.
- Disable time stretching for a sample, turn the Time knob maximum left (right-click to select 'none'). This is the default mode when samples are dropped on the Playlist.
- Manually lock a sample to the project tempo: If your samples are not being automatically stretched when you make a change to the project tempo. There are two methods, either Right-Click the 'Time' knob and select 'Project' OR for more control you can sync to the project as follows:
- 1. Select the Audio Clip's menu (top left hand corner of the Audio Clip) and choose 'Fit to tempo'.
- 2. On the pop-up dialog choose the tempo marked '(project)'
- 3. The clip is now synced (or locked) to the project tempo. Further tempo changes will automatically stretch the clip so that it stays in time and with the original pitch. At any stage you can change the stretch method to one that sounds best and/or alter the pitch using the sample options tab.
- 1. Open the Sample Properties with Edison.
- 2. Make sure the original sample tempo (Tempo (BPM)) is set correctly, you may need to use the 'Autodetect tempo' feature.
- 3. Turn Tempo-sync ON.
- 4. Save the sample with these settings (only .wav files can contain this meta-data, it will be discarded if you convert to mp3 for example).
- 5. Make sure the F10 General Settings, 'Read sample tempo information' option is ON.
- 6. Drag the audio file from the Browser and drop on the Playlist. It will then auto-stretch to match the current BPM of FL Studio.
Precomputed Processes
- Remove DC offset - Removes any DC offset or bias from the sample. DC offset is a bias in the average of the waveform above or below the zero line. This can cause clicks, distortion or FX plugins to behave badly.
- Reverse polarity - 'Flips' the waveform vertically.
- Normalize - Maximizes the sample volume without clipping.
- Fade stereo - Creates a stereo fade from the left to the right channel of the sample.
- Reverse - Reverses the sample.
- Swap stereo - Switches the left and right channels of the loaded sample.
- Sample Start (SMP START) - This control redefines the start point by trimming the sample to the start selection, updating the view to reflect this. This can be useful for functions that process the entire sample window. If you need to automate the start point use the 'Start Offset' in the Playback section.
- Length - Redefines the sample end (length) and updates the view to reflect this.
- Fade in (IN) - Applies a quick fade-in to the sample (turn maximum left to disable).
- Fade out (OUT) - Applies a quick fade-out to the sample (turn maximum left to disable).
- Crossfade - Allows you to crossfade the sample to create smooth loop sections (turn maximum left to disable).
- Trim threshold (TRIM) - FL Studio trims any silence at the end of a sample. The TRIM option allows you to raise the volume threshold at which FL Studio detects 'silence'. Using this control you can allow FL Studio to filter very quiet noise in your sample or, by setting the threshold to zero, filter 'mathematical' silence.
- Boost - Amplitude level control.
- Clip - Sample will clip if boosted above 0 dB. Useful for distortion sounds.
- A/B - Reverb type. A - Closer source, tighter space. B - Distant source, larger space. Set by ear.
Sample View
![]()
The sample view displays the loaded sample (with all pre-computed effects applied). Information and icons in the lower right section indicate bit-depth (e.g. 16-Bit, 32-Bit) and stereo configuration (: e.g. mono, stereo), respectively. NOTE: MP3, OGG, .WV and 24 bit source samples are converted to 32 bit on loading, so don't use this display to determine the source sample format. Check in the Windows browser.
The display also shows loop points (vertical red lines) and region markers (orange triangles along the top of the display) if these 'meta data' are present within the sample. Loop points and regions can be edited, added or removed using Edison.
Left-click - the sample view to preview the sound (if time stretching is enabled, the preview is tempo-synchronized).
Сэмплер – это инструмент, используемый для воспроизведения сэмплов.
Сэмпл – это короткий оцифрованный звук. Это может быть хлопок, хэт, бочка, другие синтетические и живые звуки.
Отличие сэмплера от синтезатора заключается в следующем.
Синтезатор генерирует аудио сигнал с помощью специальных алгоритмов, а сэмплер использует готовые записанные заранее оцифрованные звуки. Обычно они имеют формат WAV. Синтезатор имеет более гибкие настройки для изменения генерируемого звука. Но, в тоже время, с помощью сэмплера можно использовать записи живых инструментов.
Я рекомендую использовать оба эти инструмента для создания музыкальных композиций.
Сэмплер в FL Studio. Часть 1
Давайте рассмотрим встроенный сэмплер программы FL Studio. Это даст вам возможность понять, как использовать этот инструмент?
![сэмплер]()
Сверху находится значок в виде папки Load sample… С помощью него можно загрузить необходимый сэмпл с жесткого диска.
Область Wave – обработка сигнала
![сэмплер]()
Keep on disk (Stream sample from hard disk when possible) – воспроизведение сэмпла с жесткого диска. Если опция отключена сэмпл будет предварительно загружен в оперативную память.
Resample (Upsample to mixing frequency) – ресэмплирование. Улучшает качество сигнала, если он записан с частотой дискретизации и квантованием ниже 44100 Гц и 16 бит. При включенной опции дополнительно нагружает оперативную память и процессор. Не рекомендуется использовать для лупов, так как это может вызвать появление ненужных артефактов.
Load regions (Load sample regions and REX / ZGR beat markers) – использование информации о разбивке сэмпла. Если присутствует информация о разбивке в формате REX или ZGR, то её можно использовать для более точной обработки, при растягивании сэмпла.
Load ACID markers (Load ACID and Apple Loops beat markers) – использование информации о разбивке в формате ACID, если такая присутствует.
Область Loop – зацикливание
![сэмплер]()
![сэмплер]()
Use loop points (Use sample loop points) – использование точек зацикливания.
Красные полосы – это точки зацикливания. Если опция Use loop points включена, то после воспроизведения сэмпла, он будет продолжать проигрываться в цикле от левой точки к правой
Ping pong loop (Loopforward / backward) – режим зеркального зацикливания. Если использовать эту опцию, то при зацикливании петля будет проигрываться сначала слева направо, а потом в обратном порядке.
![сэмплер]()
Область Declicking – устранение щелчков
Из раскрывающегося списка можно выбрать метод устранение щелчков.
Щелчки могут возникнуть в результате неправильной нарезки сэмплов.
![сэмплер]()
Out only (no bleeding) – не выполнять удаление;
Transient (no bleeding) – удаление щелчков на протяжении 10 мс;
Transient (bleeding) – удаление щелчков на протяжении 20 мс;
Generic (bleeding) – удаление щелчков на протяжении 20 мс с плавным появлением и затуханием;
Smooth (bleeding) – удаление щелчков на протяжении 100 мс с плавным появлением и затуханием;
Crossfade (bleeding) – удаление щелчков на протяжении 200 мс с плавным появлением и затуханием.
Область Time stretching – растяжение сэмплов
![сэмплер]()
PITCH (Pitch shift) – изменение высоты тона сэмпла;
MUL (Time stretch) – растягивание сэмпла;
TIME (Time stretch) – растягивание времени сэмпла.
При нажатии правой кнопки мыши на этом регуляторе откроется дополнительное меню.
none – значение по умолчанию;
Autodetect – автоопределение темпа;
1 beat, 2 beats, 1 bar, 2 bars, 3 bars, 4 bars – точное определение ударов или тактов сэмпла.
В списке Stretching method (метод растяжения) можно выбрать следующие варианты:
Resample – изменение длины сэмпла и высоты тона;
Pro default – метод по умолчанию;
Pro transient – сохранение щелчков сигнала;
Transient – аналог Pro transient для маломощных компьютеров;
Tonal – более качественная обработка тональных сэмплов;
Monophonic – работа с монофоническими сигналами (используется для вокала);
Speech – метод для работы с разговорной речью.
Остальные параметры инструмента рассмотрим в следующей статье Сэмплер в FL Studio. Часть 2 .
Читайте также: