
Console redirection bios что это
a remote server. The options are Disabled and Enabled.
COM1 Resolution 100x31
Select Enabled for extended-terminal resolution support. The options are Disabled and
COM1 Legacy OS Redirection Resolution
Use this feature to select the number of rows and columns used in Console Redirection for
legacy OS support. The options are 80x24 and 80x25.
COM1 Putty KeyPad
This feature selects the settings for Function Keys and KeyPad used for Putty, which is a
terminal emulator designed for the Windows OS. The options are VT100, LINUX, XTERMR6,
SC0, ESCN, and VT400.
COM1 Redirection After BIOS Post
Use this feature to enable or disable legacy console redirection after BIOS POST. When set to
Bootloader, legacy console redirection is disabled before booting the OS. When set to Always
Enable, legacy console redirection remains enabled when booting the OS. The options are
Always Enable and Bootloader.
SOL/COM2 Console Redirection
Select Enabled to use the SOL port for Console Redirection. The options are Disabled and
*If the item above set to Enabled, the following items will become available for user's
configuration:
SOL/COM2 Console Redirection Settings
Use this feature to specify how the host computer will exchange data with the client computer,
which is the remote computer used by the user.
COM2 Terminal Type
Use this feature to select the target terminal emulation type for Console Redirection. Select
VT100 to use the ASCII Character set. Select VT100+ to add color and function key support.
Select ANSI to use the Extended ASCII Character Set. Select VT-UTF8 to use UTF8 encoding
to map Unicode characters into one or more bytes. The options are ANSI, VT100, VT100+,
COM2 Bits Per second
Use this feature to set the transmission speed for a serial port used in Console Redirection.
Make sure that the same speed is used in the host computer and the client computer. A lower
transmission speed may be required for long and busy lines. The options are 9600, 19200,
38400, 57600 and 115200 (bits per second).
COM2 Data Bits
Use this feature to set the data transmission size for Console Redirection. The options are
7 Bits and 8 Bits.
COM2 Parity
A parity bit can be sent along with regular data bits to detect data transmission errors. Select
Even if the parity bit is set to 0, and the number of 1's in data bits is even. Select Odd if the
parity bit is set to 0, and the number of 1's in data bits is odd. Select None if you do not want
to send a parity bit with your data bits in transmission. Select Mark to add a mark as a parity
bit to be sent along with the data bits. Select Space to add a Space as a parity bit to be sent
with your data bits. The options are None, Even, Odd, Mark and Space.
COM2 Stop Bits
A stop bit indicates the end of a serial data packet. Select 1 Stop Bit for standard serial data
communication. Select 2 Stop Bits if slower devices are used. The options are 1 and 2.
COM2 Flow Control
Use this feature to set the flow control for Console Redirection to prevent data loss caused
by buffer overflow. Send a "Stop" signal to stop sending data when the receiving buffer is full.
Send a "Start" signal to start sending data when the receiving buffer is empty. The options
are None and Hardware RTS/CTS.
COM2 VT-UTF8 Combo Key Support
Select Enabled to enable VT-UTF8 Combination Key support for ANSI/VT100 terminals. The
options are Disabled and Enabled.
COM2 Recorder Mode
Select Enabled to capture the data displayed on a terminal and send it as text messages to
a remote server. The options are Disabled and Enabled.
COM2 Resolution 100x31
Select Enabled for extended-terminal resolution support. The options are Disabled and
COM2 Legacy OS Redirection Resolution
Use this feature to select the number of rows and columns used in Console Redirection for

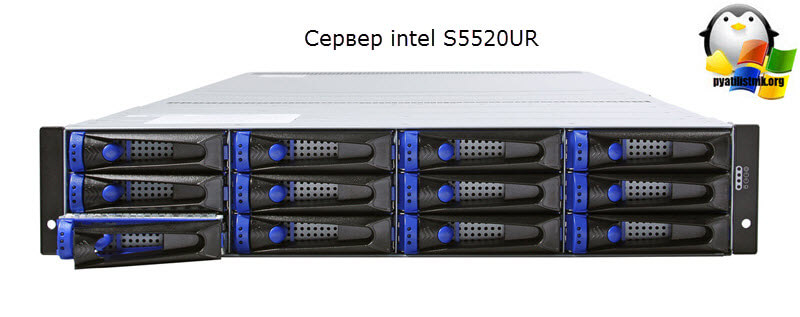
Всем привет, продолжаем изучать серверное оборудование и его функциональные возможности. Не так давно я вам рассказывал про порты управления сервером, которые нужны, чтобы вы могли удаленно устанавливать операционную систему или включать сервер, если вдруг он завис на синем экране или вообще выключен. Но в обзорной статье я не рассказывал про оборудование компании Intel, так как сам больше предпочитаю IBM или HP, но дареному коню в зубы не смотрят, сегодня расскажу, как настроить bmc порт у intel S5520UR. BMC это порт управления на основе IPMI.
Что такое bmc intel management port
Итак bmc intel management port > это порт управления на основе IPMI технологии, некий аналог ilo hp, и с менее разнообразным функционалом. Выглядит BMC порт у Intel подобным образом. Очень часто он выделяется зеленым цветом, но не везде, так, что если вдруг у вас он обезличенный, то это нормально, тоже.

Вот как выглядит сервер intel S5520UR. Если вы приглядитесь повнимательнее, то у него нет кнопок включения или перезагрузки и все управление, как раз осуществляется за счет bmc порта.
Как настроить intel bmc порт
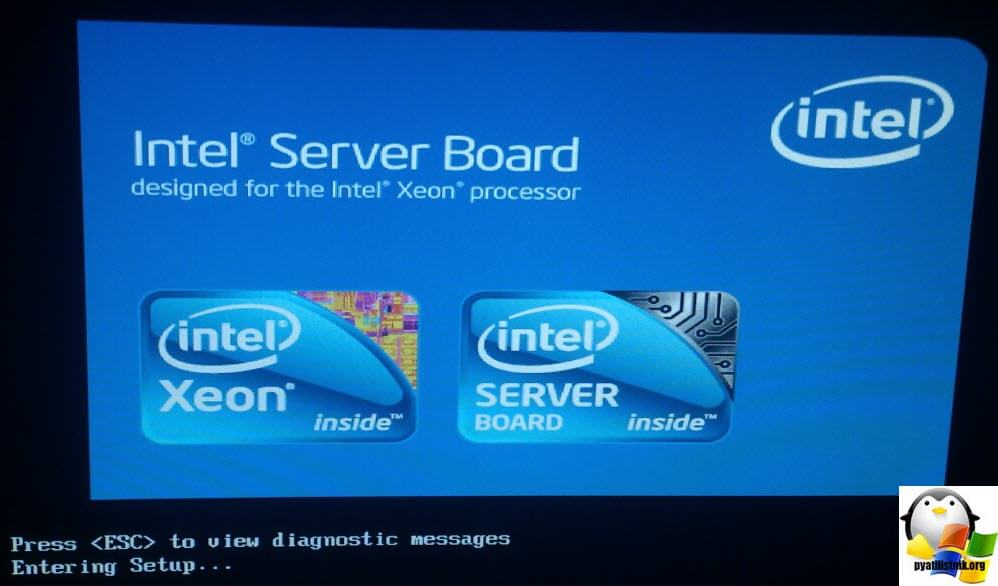
При включении intel S5520UR запускает автозапуск, и вы видите знакомое всем приветственное окно с логотипом компании, для попадания в биос нажмите клавишу F2.
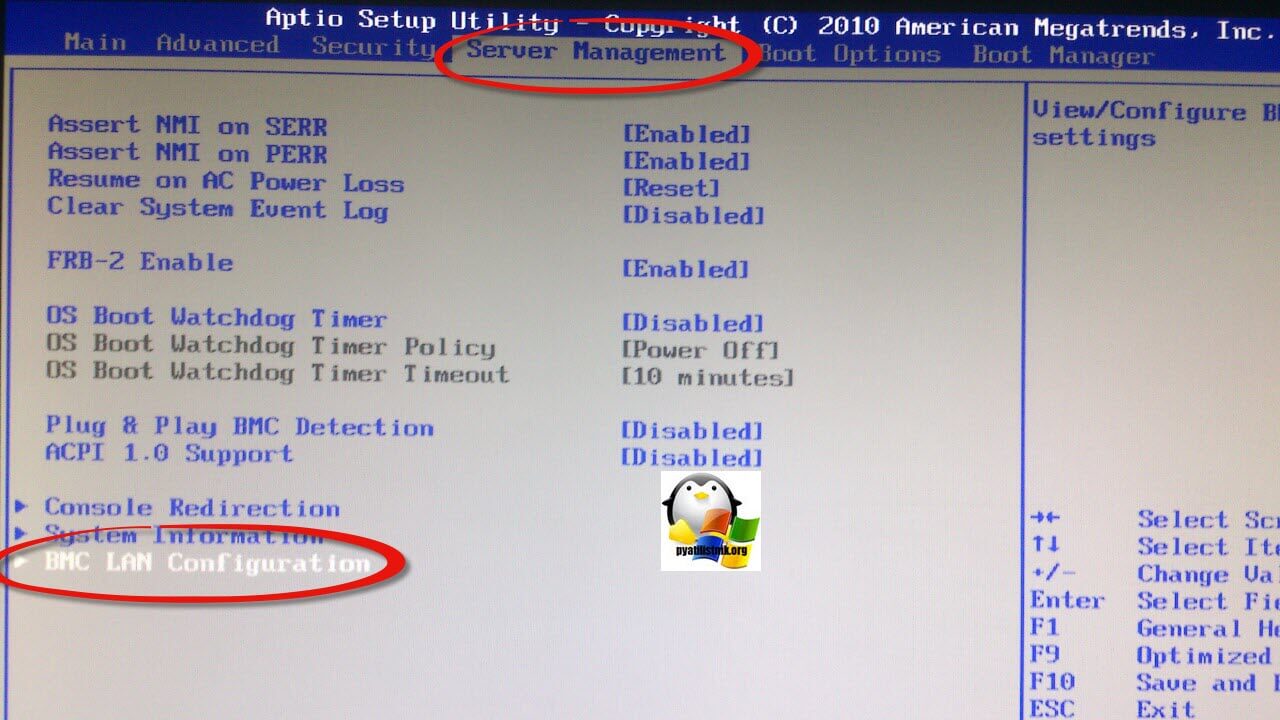
Переходим в BIOS в пункт меню Server Management > BMC LAN Configuration, именно он отвечает за последующую настройку.
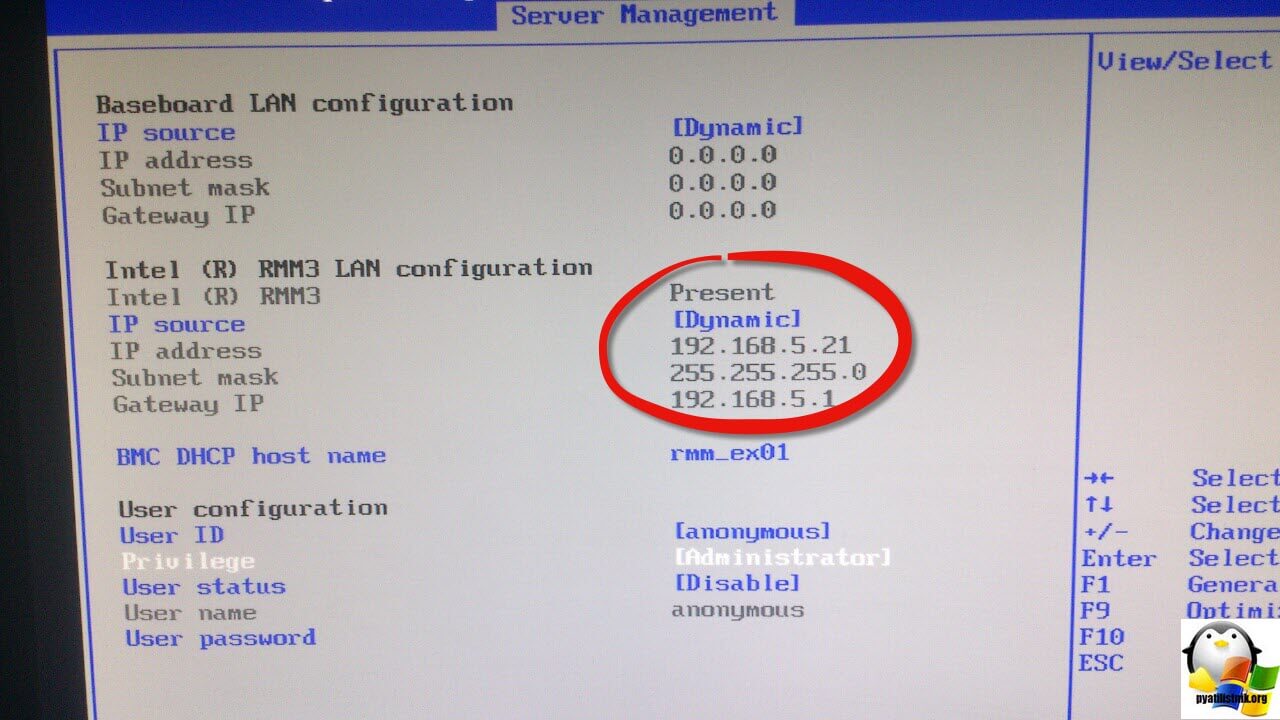
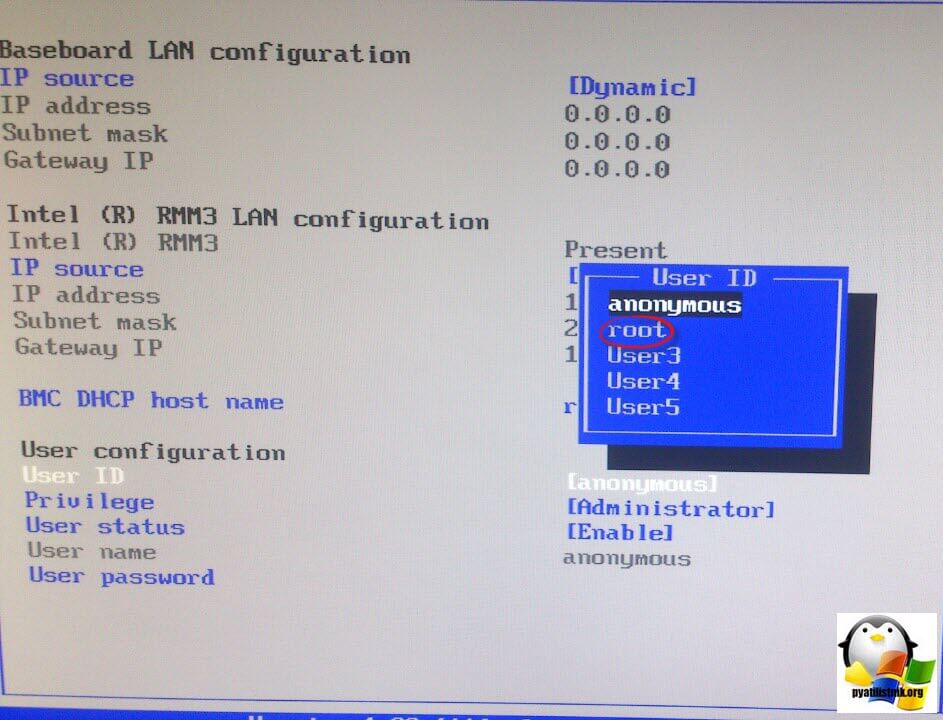
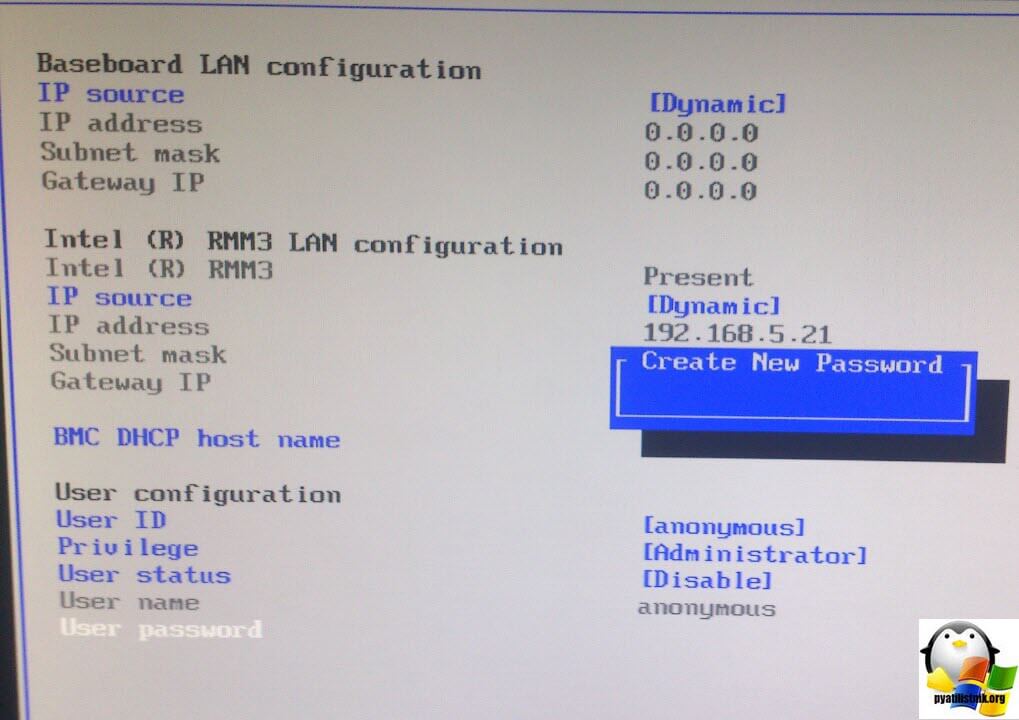
Попав в Server Management вы в поле IP address увидите полученный от DHCP сервера сетевой адрес, в моем случае это 192.168.5.21. По этому ip адресу вы будите заходить в браузере веб-интерфейс. Чуть ниже вы увидите имя вашего сервера (host name), у меня это rmm_ex01. Очень важный вопрос, это вопрос о безопасности. Убедитесь, что у вас учетная запись anonymous в состоянии Disable (выключена), так как зная ее стандартный пароль можно взломать и очень сильно навредить серверу и службам, работающим на нем.
У данной прошивки BMC есть возможность предоставить доступ для управления сервером, через порт управления для 5 пользователей, и два из них системные. Так как мы выключили с вами учетную запись anonymous, то настроим пароль для root,
Щелкаем по User password и задаем два раза, один и тот же пароль.
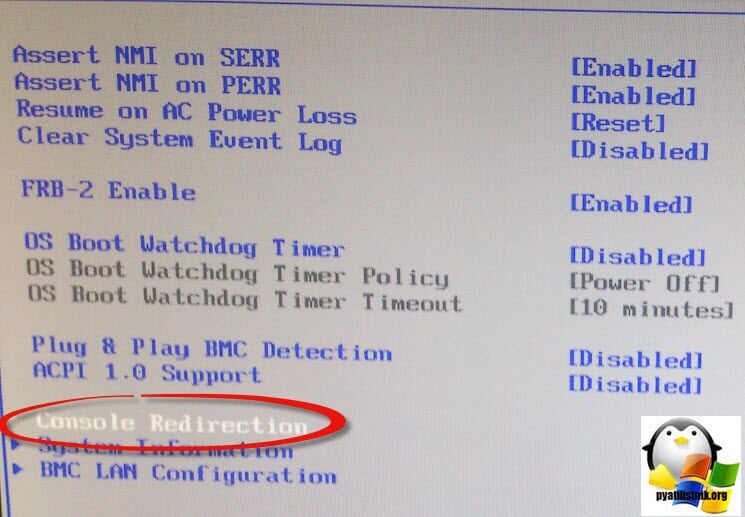
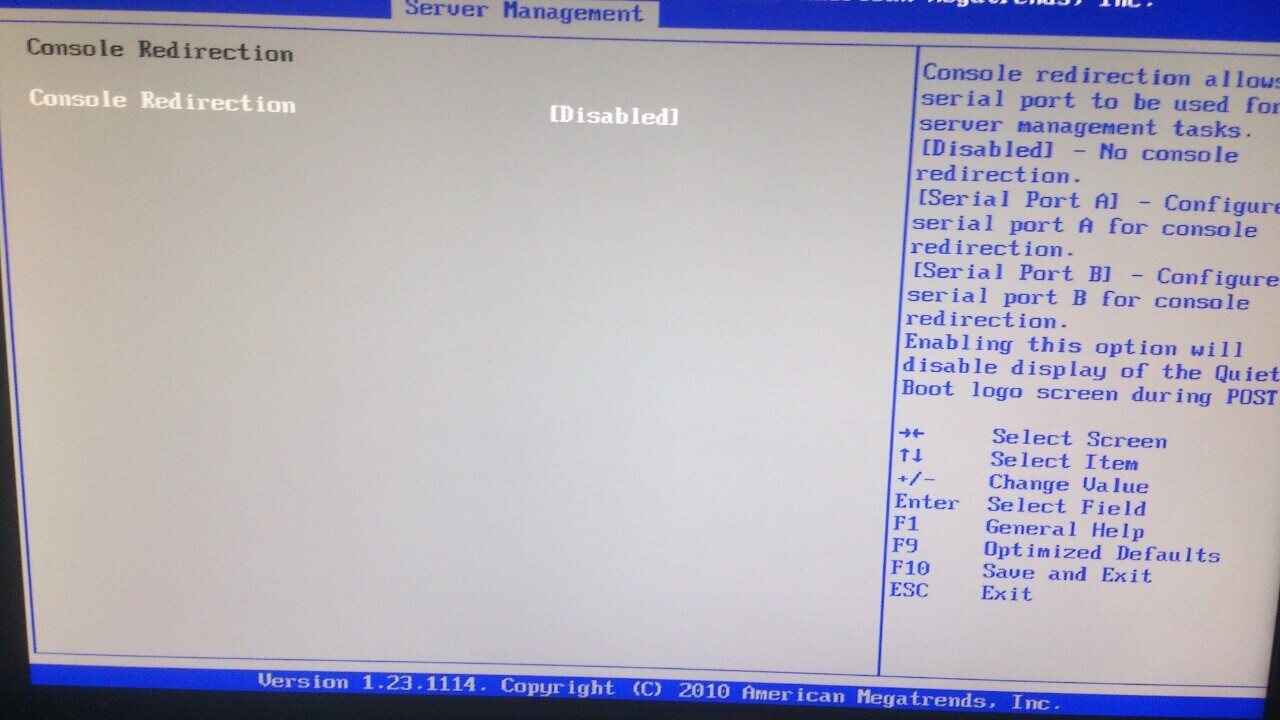
Еще сразу хочу вам посоветовать включить Java консоль управления, называется она у Intel BMC порта Console Redirection, переходим в этот пункт BIOS.
И ставим у Console Redirection состояние Enable.
Открываем браузер и пробуем залогиниться. Далее мы более детально разберем основные настройки BMC порта, вы сами увидите его удобства.

Настройка intel remote management module 3
И так у меня есть сервер intel S5520UR, давайте теперь пробежимся по основным настройкам remote management module. Самым первым, что вы увидите это вкладка System Information, тут очень много полезной информации:
- Host Power Status > статус включен сервер или нет
- RMM3 Status > установлен или нет
- BMC > есть или нет
- BMC FW Build Time > Время прошивки
- BMC FW Rev > версия прошивки
- Boot FW Rev > версия загрузчика
- SDR Packege Version

Переходим на вкладку FRU Information, я вам уже рассказывал про fru номера у IBM, если кто не знает эти номера очень часто спрашивают представители технической поддержки вендора. Так же вы тут обнаружите все серийные номера.

Далее переходим на вкладку Server Health, в ней вы увидите датчики проверки всевозможных компонентов сервера intel s5520ur, их кстати можно по SNMP мониторить.

Чуть ниже пункт Event Log, в котором записываются все события, происходящие с сервером.

Переходим в пункт Configuration, первым пунктом тут будет Network. В нем можно изменить ip адрес.

В пункте Users вы увидите, уже не 5 слотов для пользователей, а 15 и сможете тут их администрировать, выдавая нужные права и задавая пароли.

В пункте Login вы сможете задать некоторые политики безопасности для сервера s5520ur, а именно:
- Failed Login Attempts > Количество не удачных попыток аутентификации.
- User Lockout Time > время блокировки пользователя

Далее самое удобное это LDAP, это возможность настроить аутентификацию сервера через контроллер домена Active Directory. Все, что от вас потребуется заполнить поля.

Remote Session позволяет шифровать трафике при удаленном подключении, еще больше будет безопасности, но и ресурсов будет тратиться побольше.

Очень полезный пункт это Keyboard Macros, нужно это для того, чтобы вы заранее задали комбинации клавиш, для KVM консоли.

И переходим к последним пунктам Remote Control, тут в параметре Console Redirection вы сможете запускать Java KVM окно и видеть все, что происходит на экране сервера, будто вы работаете за ним физически.

Ну и естественно удаленное управление включением и выключением сервера, BMC у intel S5520UR умеет все это делать, через пункт Server Power Control.

Как видите настроить BMC порт у серверов Intel очень просто, а дальнейшее управление через remote management module 3, вызовет только положительные эмоции, функционала конечно меньше чем у других вендоров, но администрировать пойдет.
Модуль удаленного управления Intel Remote Management Module (Intel RMM) позволяет управлять сервером из любого места локальной сети или Интернет.
Управление возможно как в режиме "in-band" (на сервере загружена операционная система), так и в режиме "out-of-band" (сервер выключен либо находится в процессе загрузки).
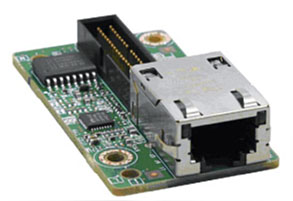
RMM-модуль представляет из себя небольшую плату, которая устанавливается внутри сервера и выглядит вот так:
RMM-модуль расширяет возможности базового контроллера управления (BMC - Base Management Controller) сервера, обеспечивая возможность подключения к серверу удаленной консоли (монитора, мыши и клавиатуры управляющей станции) и удаленных накопителей (CD-ROM, FDD, USB управляющей станции), которые сервер воспринимает как локальные, т.е. подключенные непосредственно к самому серверу.
С помощью RMM-модуля администратор может удаленно выполнять любые действия по управлению сервером: включать и выключать, настраивать BIOS, перезагружать сервер и переустанавливать операционную систему (в том числе с удаленных накопителей), запускать приложения, устанавливать программы и т.д.
RMM-модуль может включать собственный сетевой порт, который используется только для передачи управляющего трафика. Если модуль не имеет встроенного сетевого порта, управляющий трафик передается через один из портов системной платы, деля этот порт с операционной системой. Такой вариант модуля называется RMM Lite.
Удаленное управление сервером осуществляется через встроенный веб-интерфейс RMM-модуля.
Для RMM-модуля необходимо назначить IP-адрес его сетевого порта и активировать учетную запись управляющего пользователя.
Чтобы назначить IP-адрес порта RMM-модуля, сначала подключите этот порт к локальной сети. Затем войдите в BIOS SETUP, нажав клавишу F2 после включения сервера, перейдите в раздел "Server Management" и выберите подраздел "BMC LAN Configuration".
Если в сервере установлен модуль RMM Lite (без собственного сетевого порта), задайте IP-адрес для сетевого порта BMC-контроллера (в качестве порта BMC-контроллера выступает один из сетевых портов системной платы). Модуль RMM Lite будет использовать этот адрес, поскольку является частью BMC.
Если в сервере установлен стандартный модуль RMM (с собственным сетевым портом), задайте IP-адрес для сетевого порта RMM-модуля. В этом случае также можно задать IP-адрес и для порта BMC, чтобы управлять сервером по двум независимым каналам, поскольку RMM-модуль поддерживает одновременно два сеанса подключения. Однако порты RMM и BMC при этом должны находиться в разных подсетях.
Для порта Вы можете задать статический IP-адрес, указав дополнительно маску подсети и адрес шлюза по умолчанию, или выбрать динамическое назначение IP-адреса. Во втором случае повторно войдите в BIOS SETUP после перезагрузки, чтобы узнать адрес, который выдал DHCP-сервер.
Чтобы активировать учетную запись пользователя, от лица которого будет осуществляться подключение к серверу через RMM-модуль, в настройках BIOS в этом же подразделе "BMC LAN Configuration" выберите любого пользователя (кроме "anonymous"), назначьте для него права администратора, активируйте этого пользователя и задайте для него пароль. Теперь можно выйти из BIOS SETUP, сохранив изменения. Настройка RMM-модуля завершена.
Для работы с сервером через модуль RMM необходимо установить на управляющий компьютер Java Runtime Environment (JRE) Version 6, Update 22 или выше.
Кроме того, если управляющий компьютер находится вне локальной сети сервера, необходимо настроить брандмауэр сети, разрешив внешние подключения по портам TCP 7578, 5120, 5123.
Чтобы подключиться к серверу через RMM-модуль, запустите браузер на управляющем компьютере и наберите IP-адрес RMM-модуля. После загрузки страницы ведите логин и пароль пользователя BMC. Вы попадете в веб-консоль RMM-модуля:

Горизонтальное "Главное меню" консоли содержит четыре вкладки, каждая из которых имеет свое меню, расположенное вертикально в левой части экрана. Ниже кратко описывается назначение пунктов меню каждой вкладки и приводятся соответствующие примеры скриншотов. Чтобы посмотреть скриншот, нажмите на название соответствующего пункта меню.
Вкладка "Systeм Information" содержит информацию о системе:
| System Information | выводит на экран информацию о текущем состоянии системы питания, RMM, BMC и других аппаратных подсистемах, перечень которых можно увидеть на скриншоте. |
| FRU Information | выдает информацию, записанную в ячейках FRU (Field Replaceable Unit), для системной платы, корпуса, платформы и т.д. |
| System Diagnostics | запускает процедуру тестирования сервера и записывает результаты тестирования в файл. |
| DIMM Information | выдает таблицу, содержащую информацию об установленных на сервере модулях оперативной памяти. |
Вкладка "Server Health" отображает инфомацию о состоянии "здоровья" сервера:
| Sensor Readings | выводит текущие показания аппаратных датчиков сервера. При помощи кнопки "Refresh" можно обновить данные, а кнопка "Hide Thresholds" позволяет скрыть пороговые значения параметров ("NC" - пороговое значение "Предупреждение", "CT" - пороговое значение "Критическое"). |
| Event Log | содержит журнал системных событий сервера. |
| Power Statistics | выдает статистику потребляемой мощности: минимальное потребление, текущее потребление, максимальное потребление, среднее потребление. Эта возможность доступна только на серверах, которые имеют управляемые блоки питания. |
Вкладка "Remote Control" предназначена для запуска режима перенаправления консоли и управления режимом питания сервера:
| Console Redirection | при помощи кнопки "Launch Console" запускает режим удаленной консоли сервера. При этом в новом окне отображается содержимое экрана сервера, а сигналы мыши и клавиатуры управляющего компьютера перенаправляются на сервер. |
| Server Power Control | управляет режимом питания сервера. На этой странице выводится информация о текущем состоянии системы питания, а также присутствуют кнопки, при помощи которых можно выполнить команду RESET, выключить или включить сервер, а также выполнить "Power Cycle" - выключение сервера, затем включение через одну секунду. |
В режиме перенаправления консоли на мониторе управляющего компьютера отображается окно консоли с содержимым экрана сервера, а сигналы локальных мыши и клавиатуры передаются на сервер.

В правом верхнем углу окна консоли находятся кнопки клавиатурных макросов. Макросы удобно использовать в качестве замены комбинаций клавиш управления, поскольку нажатия этих клавиш не могут быть перенаправлены на сервер.
В верхней строке окна консоли расположено меню для управления режимом перенаправления консоли:
| Video | задает параметры изображения удаленной консоли. |
| Keyboard | служит для выбора языка клавиатуры и имитирует нажатия некоторых специальных клавиш. При необходимости выводит на экран изображение клавиатуры (soft-keyboard), которой можно управлять с помощью мыши. |
| Mouse | управляет изображением курсора а окне удаленной консоли, а также позволяет откалибровать мышь. |
| Options | оптимизирует параметры передачи сигналов консоли в зависимости от скорости канала и включает/выключает шифрование сигналов мыши и клавиатуры. |
| Device | подключает локальные накопители (FLOPPY, CD-ROM, USB) к управляемому серверу. Возможно также подключение файла как образа диска или USB-накопителя без ограничения по размеру. |
Более подробную информацию о работе с модулем удаленного управления сервера можно получить при помощи "Руководства пользователя" данного модуля.
Instructions for console redirection on a Solaris system can be found in the Sun Fire V60x and Sun Fire V65x Server Solaris Operating Environment Installation Guide .
Caution - Redirecting the console over serial is a procedure intended for advanced users of Linux only.
You can seriously disrupt the proper functioning of your server or render the Sun Fire V60x server or Sun Fire V65x server unbootable if you introduce a problem in the configuration files.
Redirecting the console interaction over the serial port allows the user another method to monitor the server. The goal of these configurations is to configure the bootloader to redirect its output, pass the kernel the proper parameters and configure a login session on the serial port.
This chapter specifies how to configure these options.
The BIOS redirects console output to serial by default (9600, 8N1, no handshake) until a bootloader program is run from the hard disk drive. The bootloader must be configured to support the serial console in addition to the keyboard, video and monitor (KVM) console.
Two common bootloaders are grub and Linux Loader (LILO).
Caution - Do not edit the working-image section of your configuration files directly.
Copy the working-image section and paste it within the configuration file. Make your editing changes to this copied section.
If you use grub , there are three steps to enable console redirection over serial; these steps all involve editing the grub configuration file /etc/grub.conf .
Note - The file /etc/grub.conf is a symbolic link to the file /boot/grub/grub.conf .
1. Passing the proper console parameters to the kernel.
2. Configuring the grub menu system to redirect to the proper console.
3. Removing any splash images that would prevent the proper serial-console display.
For more information on the parameters, refer to the file kernel-parameters.txt in your kernel documentation.
For more information on grub , run the command info grub .
Note - If the arrow keys do not work through your remote serial concentrator, you can use the keystroke combinations of and work to highlight the Previous and Next entry, respectively. Pressing Enter then boots that entry.
The parameter console=ttyS1 tells the system to send the data to the serial port first. The parameter console=tty0 tells the system to send the data to the KVM second.
A working-image section in your file /etc/grub.conf should have an entry for the kernel image to boot. The stock kernel entry looks like:
where < kernelrevision >is simply the kernel version that you are using.
You need to change the stock kernel entry of your image to include the console-kernel parameters, as follows:
Note - These options should be all on one line with no wrap to a second line.
Add the following two lines to the file /etc/grub.conf :
Adding these two lines sets up your serial port or your KVM as your grub console so that you can remotely or locally select a boot image from the grub menu.
Comment out or remove the following line from the file /etc/grub.conf :
Removing the splashimage line allows for greater compatibility during your serial connection; with this line removed, the splash image will not prevent the proper grub menu from displaying.
LILO uses the append feature in an image section in order to pass the kernel the proper parameters to use the serial console.
You can enter the consoles in the append statement of the file /etc/lilo.conf :
After modifying the file /etc/lilo.conf , the user must run lilo from the command line to activate the change.
For more information on LILO, run the commands man lilo or man lilo.conf .
getty
You can run a service called getty to log out of idle shell sessions automatically on the serial interface.
To enable getty , append the following line to the list of gettys in the file /etc/inittab file:
Note - It does not matter where you append this line in the list.
The list of gettys currently looks like the following:
Enabling BIOS Console Redirection
Note - Console redirection is enabled by default in the BIOS.
If the default settings have been changed in the BIOS, the following procedure explains how to change the console-redirection settings.
1. Reset or power on the Sun Fire V60x server or Sun Fire V65x server.
2. As soon as the "SETUP" option appears on the monitor, press to enter the "SETUP" section.
3. Once in the main page of the Setup menu, use the arrow keys to select the "Server" menu.
5. In the "Server"menu, select "Console redirection".
7. In the "Console redirection" screen, view the following settings. Ensure that these settings match the settings at the remote terminal. Make any necessary changes.
-
BIOS redirection port: [Serial 2 (RJ45)]
8. To exit the "Setup" menu and save your changes, press .
For the new settings to take effect, you need to reboot the server.
Once the server reboots, the console redirection will work.
Note - You can navigate the portions of the Diagnostics CD and the System Setup Utility (SSU) with the mouse as well.
The instructions in these procedures explain how to navigate the menus by keyboard.
Diagnostics CD and Service Partition over Serial Console
The Diagnostics CD or the Service Partition can run over the serial console if console redirection is enabled in the BIOS. For more information, see Enabling BIOS Console Redirection.
To run the Diagnostic functions from the Diagnostics CD or the Service Partition on the server's hard disk drive, you need to reboot the server.
Once the server reboots, the console redirection will work without any special configuration changes.
-
If you are booting to the Service Partition, you need to press to invoke the Service Partition.
Viewing and Saving the SEL Information
Note - You will need a blank floppy diskette to save the System Event Log (SEL) information for this procedure.
To view the SEL information:
1. From the Diagnostics CD, boot the Sun Fire V60x server or Sun Fire V65x server.
2. Insert the floppy diskette into the floppy diskette drive.
3. Once the Diagnostics CD has completed booting, use the arrow keys to select the "System Utilities" option from the top menu.
4. From the "System Utilities" drop-down menu, use the arrow keys to select "Run System Setup Utility (SSU)" and press Enter.
The SSU installs onto a ramdisk and takes a few minutes.
5. Once the installation is complete, press any key to continue into the SSU UI.
6. From the SSU task list, use the arrow keys to select "SEL Manager" and press Enter.
In the SEL Manager, a list of the SEL contents appears. You can page up and down through the listing to view the events.
7. To save the SEL to a floppy diskette:
b. Select "Save As. ".
c. Enter the filename for the SEL.
d. The 8.3 naming limitation in DOS applies (format: xxxxxxxx.yyy).
e. Use the TAB key to navigate to the "Drives" drop-down menu. Use the arrow keys to select "A: ".
f. Use the TAB key to navigate to OK button and press it.
g. Once the SEL information has been saved, press Enter to confirm.
8. To exit the SSU, press ESC several times and press Enter to confirm each step.
9. To exit the Diagnostics CD, use the arrow keys to select "Quit to DOS".
a remote server. The options are Disabled and Enabled.
COM1 Resolution 100x31
Select Enabled for extended-terminal resolution support. The options are Disabled and
COM1 Legacy OS Redirection Resolution
Use this feature to select the number of rows and columns used in Console Redirection for
legacy OS support. The options are 80x24 and 80x25.
COM1 Putty KeyPad
This feature selects the settings for Function Keys and KeyPad used for Putty, which is a
terminal emulator designed for the Windows OS. The options are VT100, LINUX, XTERMR6,
SC0, ESCN, and VT400.
COM1 Redirection After BIOS Post
Use this feature to enable or disable legacy console redirection after BIOS POST. When set to
Bootloader, legacy console redirection is disabled before booting the OS. When set to Always
Enable, legacy console redirection remains enabled when booting the OS. The options are
Always Enable and Bootloader.
SOL/COM2 Console Redirection
Select Enabled to use the SOL port for Console Redirection. The options are Disabled and
*If the item above set to Enabled, the following items will become available for user's
configuration:
SOL/COM2 Console Redirection Settings
Use this feature to specify how the host computer will exchange data with the client computer,
which is the remote computer used by the user.
COM2 Terminal Type
Use this feature to select the target terminal emulation type for Console Redirection. Select
VT100 to use the ASCII Character set. Select VT100+ to add color and function key support.
Select ANSI to use the Extended ASCII Character Set. Select VT-UTF8 to use UTF8 encoding
to map Unicode characters into one or more bytes. The options are ANSI, VT100, VT100+,
COM2 Bits Per second
Use this feature to set the transmission speed for a serial port used in Console Redirection.
Make sure that the same speed is used in the host computer and the client computer. A lower
transmission speed may be required for long and busy lines. The options are 9600, 19200,
38400, 57600 and 115200 (bits per second).
COM2 Data Bits
Use this feature to set the data transmission size for Console Redirection. The options are
7 Bits and 8 Bits.
COM2 Parity
A parity bit can be sent along with regular data bits to detect data transmission errors. Select
Even if the parity bit is set to 0, and the number of 1's in data bits is even. Select Odd if the
parity bit is set to 0, and the number of 1's in data bits is odd. Select None if you do not want
to send a parity bit with your data bits in transmission. Select Mark to add a mark as a parity
bit to be sent along with the data bits. Select Space to add a Space as a parity bit to be sent
with your data bits. The options are None, Even, Odd, Mark and Space.
COM2 Stop Bits
A stop bit indicates the end of a serial data packet. Select 1 Stop Bit for standard serial data
communication. Select 2 Stop Bits if slower devices are used. The options are 1 and 2.
COM2 Flow Control
Use this feature to set the flow control for Console Redirection to prevent data loss caused
by buffer overflow. Send a "Stop" signal to stop sending data when the receiving buffer is full.
Send a "Start" signal to start sending data when the receiving buffer is empty. The options
are None and Hardware RTS/CTS.
COM2 VT-UTF8 Combo Key Support
Select Enabled to enable VT-UTF8 Combination Key support for ANSI/VT100 terminals. The
options are Disabled and Enabled.
COM2 Recorder Mode
Select Enabled to capture the data displayed on a terminal and send it as text messages to
a remote server. The options are Disabled and Enabled.
COM2 Resolution 100x31
Select Enabled for extended-terminal resolution support. The options are Disabled and
COM2 Legacy OS Redirection Resolution
Use this feature to select the number of rows and columns used in Console Redirection for
Читайте также: