
Clip studio paint не работает трансформация

Программа стала зависать во время сохранения recovery information, да так, что приходится закрывать
Прямо сейчас тоже зависла, а у меня холст не сохранен
Может быть кто-нибудь знает, что делать?

Саша, ну искать бек ап файла, если прога его сделала. Примерно в папках тут C:\Users\User\Documents\CELSYS\CLIPStudioPaintData (вместо User как у вас ПК подписан в ПУСК)

Саша, обычно такое может быть, если ваш файл в неродном формате, а в псд, или из-за слабого компа. Если проблема в компе, то можно просто отключить это автоматическое сохранение в настройках и сохранять вручную.
А насчет папки, просто посмотрите файлы в той папке, про которую написал Николай, есть ли там ваш файл

Здравствуйте, у меня проблемы с текстом, когда нажимаю на "А" (текст) все вроде бы хорошо, но в какой-то момент, когда выбираю шрифт, вдруг все слетает, пропадают все надписи, текст не отображается даже вне программы (если зайти в проводник на компьютере, то отображаются только иконки папок, а на том месте где пишется название папки, где она располагаются — просто пустота, текст не отображается ни в одном приложении. После перезагрузки компьютера текст снова виден, и клип студио работает, но ровно до тех пор пока не пытаюсь поменять шрифт

Николай, "ну искать бек ап файла, если прога его сделала. Примерно в папках тут C:\Users\User\Documents\CELSYS\CLIPStudioPaintData (вместо User как у вас ПК подписан в ПУСК)"
кстати, не знаешь, как оно там устроено? файлы бэкапа самоуничтожаются со временем? А то по логике папка может заполняться, пока комп не лопнет. или вручную чистить? . это беспокоит.
настроек не видал, руководящих обьёмом этой папки?
Игорь, Оно храниться несколько дней и удаляется самостоятельно. Сужу по своим папкам - похоже файл живет только три дня
Игорь,как устроено не знаю, но по факту - да, они самоуничтожаются.Прога установленна очень давно, но когда последний раз искал бэкап, то там были бэкапы только файлов последних работ. По моим ощущениям там файлы хранятся за неделю и затираются.

Лесяпо идее вверху в программе вкладка Виндовс/Воркспейс/ и там выбираете нужный. Покрайней мере те, что я сохранял для себя находятся там. Возможно загруженные поначалу хранятся в папке довнлоадс, что в материалах и их либо отттуда ставить, как то, либо перетянуть на Виндовс/Воркспейс, чтобы они там появились. Сам я воркспейсы не скачивал, так что это предположения.


Добрый день, может кто подскажет, сломался старый планшет, сегодня установила новый, и чувствительности в программе нет. Раньше клип работал идеально. Какие есть варианты решения?

Валерия, в настройках(Ctrl+K) есть вкладка таблет, там можно верхний переключатель переключить с табПиСи на ВинТаб

Криворукая скотина, то есть я случайным образом скрыл инструментарий и забыл как его вернуть. Буду признателен вашей помощи господа.
Никита, в меню виндо все панели, поставь нужные галочки. Или восстановить рабочее пространство, там же.

День добрый! Возникла проблема с отзеркаливанием. Когда использую flip gorizontal на панели навигации, то насколько приближена моя камера сохраняется. Но когда для того же отзеркаливания использую горячую клавишу, то приближение сбрасывается до дефолтного, которое охватывает весь холст. Подскажите, можно с этим что-либо сделать? Заранее спасибо
Полина, может это какие-то баги новых версий? У меня 1.9.4 стоит, назначил на горизонтальное отражение вида F12. Никакой разницы между нажатием кнопки в панеле или горячей клавиши. Подумал, что вы назначили отражение холста вместо вида. Ну да отзеркаливается по другому: вида- относительно середины видового окна, то есть положение видового окна остается привязанным к изображению в нем. А при отражении холста- вид сбрасывается на середино холста, само изображение может пропадать с экрана, так как находилось где-то на периферии. Но и в этом случае масштаб остается прежний.

Здравствуйте. Не могу настроить клавиши стилуса вообще ни на какие команды. Кнопки планшета в драйверах настраиваются нормально.
И подскажите, пожалуйста, существует ли в клипе комбинация/графа в настройках горячих клавиш для команды "отразить холст горизонтально", вроде везде искала, но не нашла этот "flip horizontal"
Маргарита, насчет стилуса не подскажу, почему у тебя не настраивается. Попробуй в других прогах, работает ли там? Может проблемы с самим стилусом.
А настройка клавиш в меню файл. В окне настройки клавиш выбираешь настроить меню. "flip horizontal" на скрине отразит вид горизонтально (F12 это я назначил по умолчанию не назначена) ищешь в ветке "вид". Но есть еще команды отразить по горизонтали(слой(слои) выделенную область на этих слоях) в меню "редактировать"(Edit) и там в трансформации. Можно отразить холст, ищешь тоже в ветке Edit в коленце поворот/инвертирование холста

Здраствуйте.
Что делать если удалила всю левую часть тоесть перья, закрашивание в фона, градиент, ластик и Т. д. Как сбросить настройки?

Здравствуйте. Возможно ли рядом с основным рисунком открыть маленькое его же окошко, которое в режиме онлайн отображало бы изменения? Спасибо
Касандра, конечно можно. Вначале открываешь еще одно окно на документ и потом одно из окон просто стаскиваешь на хост. Окно станет плавающим. Размер окна, его положение можно менять- тянешь за верх или боковины окна. Или можешь не стягивать а нажать кнопку Tiled, потом одно окно можно уменьшить по горизонтали потянув за середину между окнами. Но как по мне стянуть лучше. Навигация и масштаб в каждом окне независимый. И кстати, отразить вид работает тоже на отдельное окно.
Так же можешь использовать панель навигатора в качестве дополнительного вида. Можно его вытащить из общего стека панелей (за название стянуть на холст) и как обычное окно можешь его растягивать перемещать.

Платон, может триал закончился, может программа стала запускаться в песочнице какого-то антивируса. Сложно сказать.

Добрый день. С недавнего времени после перезагрузки клип студио перестали сохраняться настройки интерфейса. Например после изменения цвета самого интерфейса или его размера после перезагрузки программы он меняется к исходному. В остальном программа работает как обычно. Возможно ли это решить? Также перестали появляться сохраненные работы в окне "works".


Transform
Selecting items from [Edit] menu > [Transform] with a layer selected, moves or transforms the selected layer.
Mode types
The Mode types listed under [Edit] menu > [Transform] are as follows.
Scales up/down or rotates the image. For details, see " Scale/Rotate " .
Scales up/down or rotates the image. For details, see " Scaling Up/Scaling Down " .
Rotates the image. For details, see " Rotate " .
Freely transforms the image. For details, see " Free Transform " .
Distorts the image. Dragging the corner handles of the bounding box moves the image in the direction of the the guide lines. Dragging the middle point handles of the bouding box, moves that line parallel to the other side of the guide line. For details, see " Distort " .
Skews the image. Dragging the handles moves the whole side of the image in the direction of the the guide lines. For details, see " Skew " .
Skews the image. Dragging any of the corner handles will move the opposite corner handle into the opposite direction. For details, see " Perspective " .
Flips the image horizontally. For details, see " Flip Horizontal " .
Flips the image vertically. For details, see " Flip Vertical " .
Mesh Transformation [PRO/EX]
Allows you to create guides and handles by dividing a selected area with a lattice to transform an image by portions by dragging the corresponding lattice point. For details, see " Mesh Transformation [PRO/EX] " .
Transform image
This section describes how to transform images in a variety of ways.
· For details on how to use [Flip Horizontal], see " Flip Horizontal " .
· For details on how to use [Flip Vertical], see " Flip Vertical " .
· For details on how to use [Mesh Transformation], see " Mesh Transformation [PRO/EX] " .
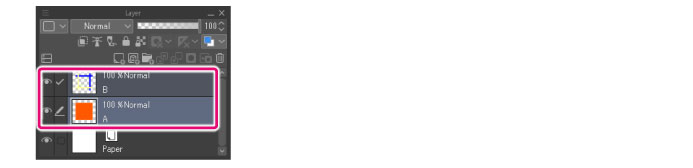
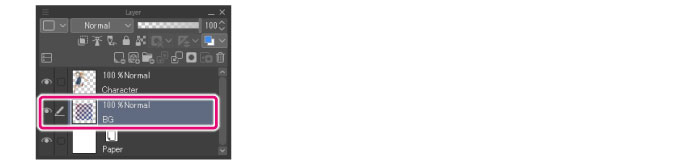
1 First select a layer on the [Layer] palette.
· Selecting multiple layers transforms all of the selected layers.
· To transform layers other than Raster layers, Vector layers, Layer Masks and Selection layers, see " Command " .
· To change the Layer Mask only, you must unlink the Layer and the Layer Mask. For details, see " Link Mask to Layer " .
· To change the Ruler only, you must unlink the Layer and the Ruler. For details, see " Link Ruler to Layer " .
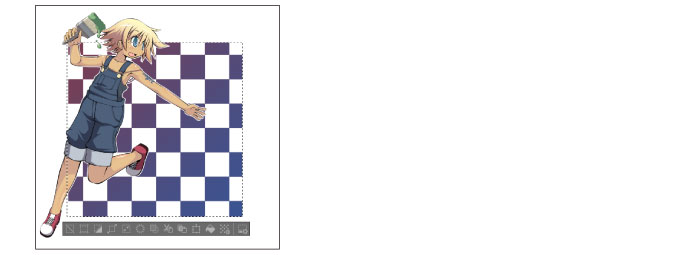
2 Using the selection tool, create a selection.
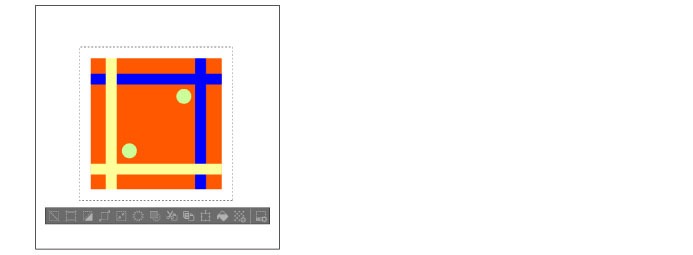
· If there is no selection area, the entire drawn area of the selected layer will be the target of the transformation.
· Only selections on Raster layers, Vector layers, Layer Masks and Selection layers can be transformed.
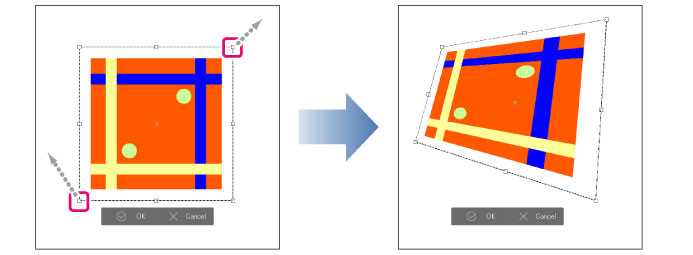
3 Select the method of transformation from the [Edit] menu > [Transform]. In this example, [Free Transform] is selected.
4 Drag either the bounding box guide lines or handles to transform the image.
For details on how to transform an image, see " Using handles and palettes to transform " .
5 Click [Confirm] on the launcher below the bounding box to apply the transformation.
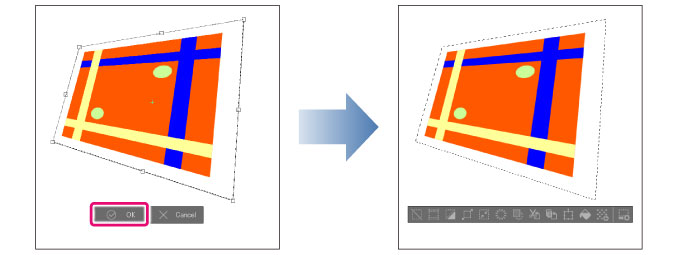
· You can double-click inside the bounding box to confirm the transformation.
· Pressing Enter also applies the transformation.
· Press Esc to cancel the transformation.
· If the [Transform launcher] does not appear, select [View] > [Object Launcher].
Using handles and palettes to transform
Selecting items from [Edit] menu > [Transform] shows the handles and guide lines allowing you to adjust them.
You can also adjust transformation values and the transformation mode from the [Tool Property] Palette.
For details on how to use [Mesh Transformation], see " Mesh Transformation [PRO/EX] " .
Using the handles to transform
Dragging a handle allows you to transform the image. The directions the handles can move depends on the transformation mode. For deatils on how to use, see " Mode types " .
Move image
Click on the inside of the bounding box and drag to move the image.
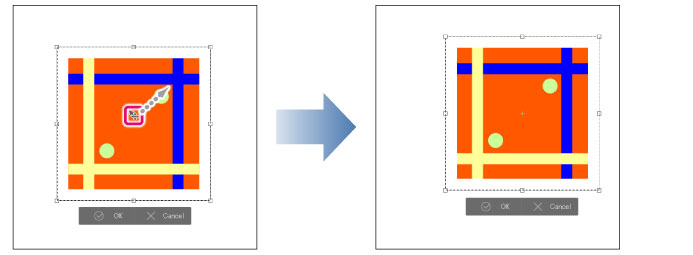
Hold down Shift while dragging the drawing area or bounding box to move the image horizontally, vertically, or along a 45-degree diagonal angle.
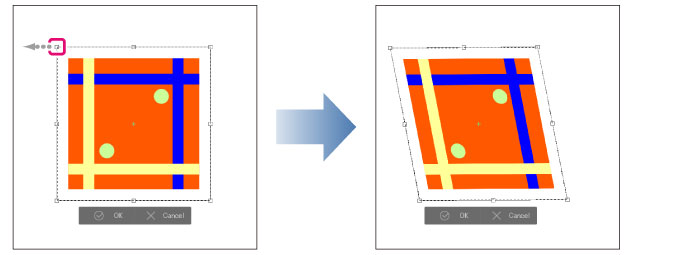
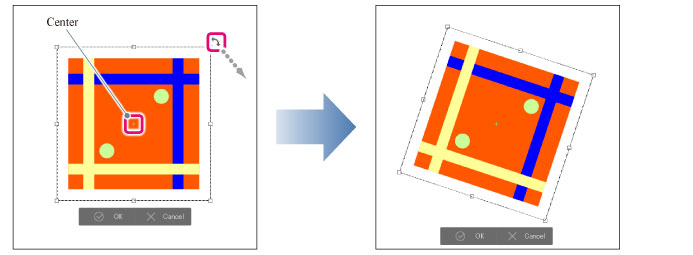
Rotate image
Drag outside the bounding box to rotate the image around the center (+) point.
· Hold down Shift while dragging to rotate in increments of 45 degrees.
· Dragging the center moves the center of rotation. Change the center point’s position from the [Tool Property] palette’s [Center of rotation].
· Hold down Shift while dragging the center point to move the center point horizontally, vertically, or along a 45-degree diagonal angle.
· Hold down Alt while clicking the canvas to move the center point to wherever you click.
· You cannot rotate the image while using [Scale] from [Edit] > [Transform]. To rotate an image either select [Rotation angle] from the [Tool Property] Palette or a transformation option from [Mode]. For details on how to change this, see " Changing the Mode " .
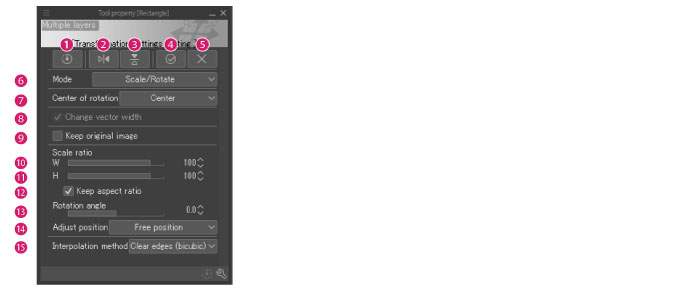
Adjusting transformations with the Tool property palette
You can the image scale ratio and angle while transforming from the [Tool Property] Palette.
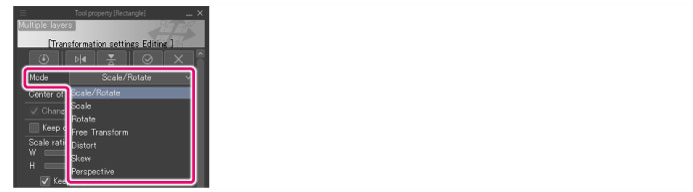
Changing the Mode
[Mode] on the [Tool Property] palette allows you to change the transformation method.
Tool property palette settings
When transforming, the following operations can be performed from the [Tool Property] palette.
· If the transformation is recorded in an auto action, [Auto action settings] will be shown in the [Tool Property] palette. For details, see “Transformation settings” in the Clip Studio Paint Tool Setting Guide .
· For details on how to use [Mesh Transformation], see " Mesh Transformation [PRO/EX] " .
(1) Reset transformation
Restores the image being edited to its pre-transformation state.
(2) Flip horizontal
Reverses the image horizontally around the center.
(3) Flip vertical
Reverses the image vertically around the center.
Commits the transformation.
(5) Cancel
Cancels the transform.
(6) Mode
This setting changes the transformation mode. You can select from [Scale/Rotate], [Scale], [Rotate], [Free Transform], [Distort], [Skew] or [Perspective].
(7) Center of rotation
Sets the center of rotation for the image.
You can select from [Center], [Top left], [Top right], [Bottom right], [Bottom left], [Top], [Left], [Right], [Bottom] and [Free position].
(8) Change vector width [PRO/EX]
Turning this on allows you to scale the line width of a Vector layer, a Balloon layer or a Frame Border folder.
(9) Keep original image
When turned on, the original image can be kept when moving or transforming.
Selecting the next layer repeats the transformation on the duplicated layer. The original image is left on another layer.
· Image material layer
· Stream line layer
· Saturated line layer
(10) Scale ratio (Horizontal)
Specifies the horizontal width of an imported image as a percentage of the original image (%).
(11) Scale ratio (Vertical)
Specifies the vertical width of an imported image as a percentage of the original image (%).
(12) Keep aspect ratio
When this is on, the image will keep its original aspect ratio (proportions) when scaling up or down. Use the handles to keep aspect ratio of original image when scaling.
(13) Rotation angle
Specifies the image rotation angle with respect to the horizontal position.
(14) Adjust position
Allows you to adjust the size of an image being transformed automatically. The size is specified by the size of the bounding box.
The size of image’s bounding box can be adjusted within the size of the Canvas.
The size of image’s bounding box can be adjusted within the size of the Bleed border.
The size of image’s bounding box can be adjusted within the size of the Cropped border.
The size of image’s bounding box can be adjusted within the size of the Default border.
The size of image’s bounding box cannot be adjusted.
· When [Bleed border], [Cropped border], or [Default border] is selected on a canvas on which [Bleed border], [Cropped border], and [Default border] are not set, the size of the [Guide] is adjusted so that it is included in the [Canvas].
(15) Interpolation method
You can select the method for interpolating the colors of pixels when transforming images.
Smooth edges (bilinear)
This method blends the colors of neighboring pixels to create smooth outlines (boundaries between colors). However, outlines may become blurred depending on the image.
Hard edges (nearest neighbor)
When interpolating the image, the pixels in the image are duplicated. Since the colors are not affected by neighboring pixels, outlines (boundaries between colors) remain sharp. However, outlines may become jagged depending on the image.
Clear edges (bicubic)
This method blends the colors of neighboring pixels to create smooth outlines (boundaries between colors). This method results in stronger outlines compared to the [Smooth outline (bilinear method)] setting. However, white noise may appear around outlines depending on the image.
High accuracy (average colors)
The average colors of the original pixels are strictly calculated and contained for each pixel after the transformation. Scaling up makes the line sharper and scaling down makes the line smoother. Even detailed lines can be preserved when scaling the image down. However, this method can result in blurred outlines and can take a long time to process depending on the image.
Free Transform
Selecting [Edit] menu > [Transform] > [Rotate] freely transforms a layer.
Dragging a handle allows you to transform the image. [Free Transform] allows you to freely transform by dragging a handle.
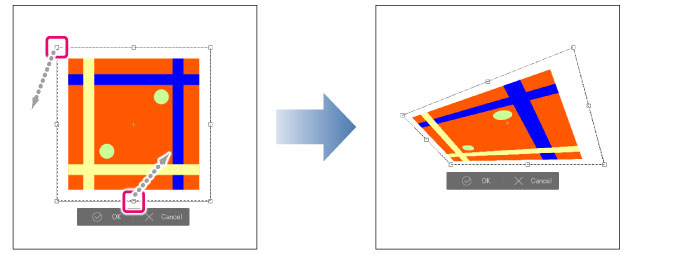
· Hold down Shift while dragging a handle to move the handle according to the direction of the guideline.
· Dragging a handle while holding down Ctrl allows you to scale the image up and down.
· Dragging a handle while holding down Ctrl + Shift allows you to scale the image without changing the original aspect ratio.
· Dragging a handle while holding down Ctrl + Alt keys allows you to scale up/down the image from the center point.
· For details on the Transform operates, see " Transform image " .
· For details on how to use Transform, see " Using handles and palettes to transform " .
· You can also use the [Tool Property] Palette to Transform. For details on the [Tool Property] palette settings, please see to the following " Tool property palette settings " .
· Layers that support [Free Transform] include Raster layers, Vector layers, Layer Masks, Image material layers, Frame Border folders, Rulers, and Selection layers.
Mesh Transformation [PRO/EX]
Allows you to create guides and handles by dividing a selected area with a lattice to transform an image by portions by dragging the corresponding lattice point.
Layers that support [Mesh Transformation] include Raster layers, Vector layers, Layer Masks, and Selection layers.
1 On the [Layer] palette, select the layer you want to transform.
· Selecting multiple layers transforms all of the selected layers.
· To change the Layer Mask only, you must unlink the Layer and the Layer Mask. For details, see " Link Mask to Layer " .
2 Using a selection tool, create a selection.
If there is no selection area, the entire drawn area of the selected layer will be the target of the transformation.
3 Select the [Edit] menu > [Transform] > [Mesh Transformation].
4 On the [Tool Property] palette, set the number of lattice points (handles).
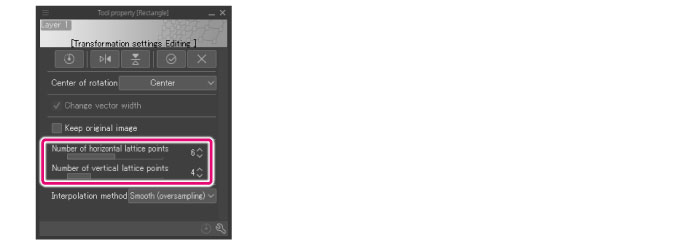
You can set up to 10 lattice points.
5 As many lattices as you set will show in the selected area of the image. Transform by dragging the bounding box or handles.
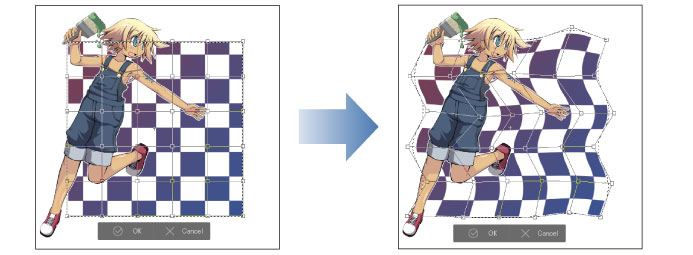
Hold down Shift while dragging a handle to move the handle horizontally, vertically or 45° diagonally.
6 Click [Confirm] on the launcher below the bounding box to apply the transformation.
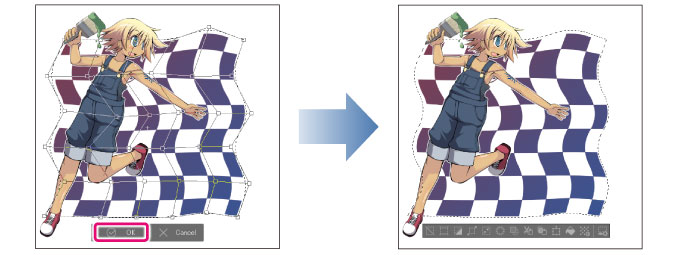
· Double click on areas other than the handles inside the guides to confirm the transformation.
· Pressing Enter also applies the transformation.
· Pressing Esc before confirming the transformation cancels it.
· If the [Transform launcher] does not appear, select [View] > [Object Launcher].
Tool property palette settings
[Mesh Transformation] becomes and item in the [Tool Property] Palette when you are using it.

If the transformation is recorded in an auto action, [Auto action settings] will be shown in the [Tool Property] palette. For details on the setting items, see the description of "Transformation settings" in "CLIP STUDIO PAINT Tool Setting Guide" .
(1) Reset transformation
Restores the image to the original state before transforming.
(2) Flip horizontal
Flips the image horizontally around the center.
(3) Flip vertical
Flips the image vertically around the center.
Applies the transformation.
(5) Cancel
Cancels the transformation.
(6) Center of rotation
Specifies the center of the image transformation.
You can select from [Center], [Top left], [Top right], [Bottom right], [Bottom left], [Top], [Left], [Right], [Bottom], and [Free position].
(7) Change vector width
If turned on while scaling a vector layer, the line width changes in accordance with the transformation.
(8) Keep original image
When turned on, the original image can be kept when moving or transforming.
(9) Number of horizontal lattice points
Specifies the number of horizontal lattice points.
(10) Number of vertical lattice points
Specifies the number of vertical lattice points.
(11) Interpolation method
Select how the colors of surrounding pixels will blend when the image is transformed.
Each pixel is divided into multiple pixels and calculated as an average of the original pixel colors before transformation. This method makes outlines smoother, but may take a long time to process.
Hard edges (nearest neighbor)
The outline of the color separation borders are blended with the color of the adjacent pixels and smoothed. However, white noise may appear around the outline depending on the content being transformed.
Читайте также: