Adobe omniture как работать
The custom analytics integration allows you to analyze Dynamic Yield campaigns in your analytics platform. This article details how to set it up for Adobe Analytics.
The most common use case for integrating with a 3rd party Analytics platform is to record information about which Dynamic Yield Experiences (e.g. Campaigns, Variations, Product Recommendations) visitors were exposed to.
There are three moving parts to the integration:
- A live Dynamic Yield Campaign, with the Execute Custom Integrations toggle turned on, which enables the Campaign to expose its metadata (eg.. Campaign, Experience and Variation Names) whenever it is served to a user.
- A Custom Integration Function , which acts as a translation layer between Dynamic Yield and your analytics stack, and defines how the exposed data is transformed and stored. We will use these functions to create a data layer object.
- A call to Adobe Analytics. Depending on your implementation, this can be done directly from Dynamic Yield or from your Tag Manager.

Setting Up The Integration
Setting up the integration has 3 steps:
- Configure Adobe Analytics to receive the integration data, using a List Variable.
- Set up a global data layer object using Dynamic Yield’s Custom Analytics Integration functions
- Populate the adobe list variable with the contents of the data layer, and send a call to Adobe. This can be done via Dynamic Yield or your tag manager solution.
Step 1: Configure a List Variable in Adobe Analytics
Adobe Analytics’ list variables allow you to use a single delimiter-separated string to store multiple values, which can then be split and analyzed independently. Each value will represent a different campaign, experience, and variation combination.
To set up a list variable, navigate to its configuration page following this documentation , and configure one of your variables as recommended below:

- Name: “Dynamic Yield”
- Expiration : this is the equivalent of Dynamic Yield’s Attribution Window . If Attribution IQ is part of your Adobe package, you will be able to edit expiration on demand when analyzing your results. If you don’t, you will have to make a choice upfront. In this case, we recommend selecting the most common attribution window you use in Dynamic Yield. If Dynamic Yield experiences are set up with:
- 7-Day attribution, set expiration to Custom attribution = 7 days .
- Session attribution, set expiration to Visit . Note that sessions/visits are defined differently in Dynamic Yield and Adobe. When choosing this expiration, you might notice higher discrepancies across platforms than when using time-based expiration. Learn more about Session definition in Dynamic Yield.
-
, replicating this in Adobe Analytics will require you to additionally create Sequential Segments, which include Visits or Visitors who also triggered the Adobe Analytics analog of the conditional event utilized for Post-Event attribution in Dynamic Yield.
- Value Delimiter : set it to “|” (pipe). Changing it to a different delimiter requires adjustments to the script in step 2 of the integration.
- Allocation: Set it to “ Full” to mimic Dynamic Yield’s attribution logic, so that each individual test receives full conversion credit.
- Max Values : 250
- events : an array of objects containing different types of events, triggered by different types of interactions. These events can be used to trigger individual calls to Adobe Analytics. In this setup however we will bundle the content of multiple events using the list variable, reducing the number of calls to Adobe Analytics to once per page to reach a good compromise between tracking accuracy and costs.
- listVar : a single string containing a pipe-concatenated distinct list of campaign-experiment-variations loaded in the page. With each new impression event above, the relevant information will be appended to the existing value. The Adobe list variable can be populated directly with this value.
- uniqueImp : an array that is used to create the ‘listvar’ field above.
- Variation impression : this event will execute the function every time a test or campaign variation is served for a visitor on your site.
- Recommendation impression: this event will execute the function every time a set of items were rendered on the page. It carries information about the algorithm and the items that were recommended.
- In Dynamic Yield, go to Settings › Integrations .
- Click Custom Analytics Platform and click Enable Integration .
- Select Variation Impression.
- Replace the example code with the following, and then save.
- After a few minutes, open the browser console on your website, where at least one Dynamic Yield campaign is running, and type dyGlobalObject. You should see the events array being populated with one event of type impression for each of the running campaigns, and the listVar element is populated with the pipe-concatenated list [campaign_name].[experience_name].[variation_name], like the example below:
- Choosing a different separator (e.g. in case some of your entity names contain dots)
- Choosing different entity values (e.g. you might want to utilize IDs instead of names to save space in your list variable (remember each value of the list has a maximum length of 250 characters)
- Go to the Custom Analytics Platform integration and check on Recommendation Impressions .
- Replace the example code with the following and save.
- Via Dynamic Yield, once per page
- Custom, via your tag manager solution
- Go to Site Personalization › New Campaign and click Custom Code .
- Select to trigger the campaign on page load . Do not worry, we are only going to set an event listener on page load, the contained function will execute before unload for static sites, and on spa_start for single page applications.
- Important: since this is an auxiliary campaign and we do not want to track it in Adobe, disable the Execute custom integration and Serve On every SPA event options, and click next.
- Click on the Variation tab (leaving the Targeting tab empty, targeting all users)
- Click New Variation and select the Custom Code template.
- Go to Design and paste the following code in the JS tab. Note that in this code snippet we are explicitly populating list variable number 3. Replace 3 with your list variable identifier as defined in Adobe Analytics, then click Save Variation.
- Select any goal as your primary metric, keeping in mind, you are not setting up an actual test, but just an auxiliary campaign to make the API call, so any goal will do.
- Make sure the allocation is set to send 100% of the traffic to your variation.
- Click Save Experience and Save & Publish the Campaign.
- DY Campaign
- DY Experience
- DY Variation
- Navigate to Admin › Classification Rule Builder
- Add a new rule of type Regular Expression
- Select your list variable as input
- Select a matching condition based on the separator. For example, if using “.”, the match criteria can be set to: ^(.*)\.(.*)\.(.*)
- Since we are splitting into three dimensions, make sure to classify the results by their ordinal position: DY Campaign = $1, DY Experience = $2, DY Variation = $3
- Adobe Analytics;
- Adobe Target;
- Adobe Audience Manager;
- Adobe Campaign;
- Adobe Experience Manager;
- Adobe Media Optimizer;
- Adobe Primetime;
- Adobe Social.
- Анализируем топ материалов номеров интерактивных изданий (наших журналов в Newsstand в App Store), это для нас важно, потому что это нельзя измерить в печатной версии журнала. Тем самым данная информация представляет огромный интерес для редакции печатного издания.
- Анализ всевозможных метрик, для нас самое интересное: загрузился или не загрузился номер, сколько удалось скачать, сколько пользователей открыли, повторно открыли, переходы, просмотры, старт, стоп видео/аудио, крэши, просмотры рекламы, просмотры материалов, среднее время проведения на страницах и в приложении в целом и так далее.
- Радует настройка всевозможных отчетов и выгрузка в нужном формате.
- Хорошее приложение Adobe Analytics для iPhone/iPad, если правильно настроить дашборд.
- The program formerly known as “Omniture”
- Adobe Entry Page vs. Google Analytics Landing Page
- Adobe Success Events vs. Google Analytics Goal Completions
- Differences in Dimensions and Metrics Scope
- Adobe Analytics Report Navigation
- Standard Adobe Reports
What is Adobe Analytics?
Similar to tools like Google Analytics 360 , Adobe Analytics offers notable benefits and features (avoiding sampling, custom tracking flexibility, etc.), justifying the notable yearly cost associated to it.
Why use Adobe Analytics?
- Becoming familiar with Adobe will naturally expand your analytics skills! While many elements of Google Analytics tracking are applicable to Adobe; Adobe’s new features, tools, and caveats will deepen and enrich your analytics knowledge base.
- If you understand the features within Adobe Analytics, you will save yourself time as well as others by quickly solving complex analysis problems, creating expansive and actionable reporting, and setting up strategic tracking.
Comparing Dimensions and Metrics in Google Analytics vs Adobe Analytics
Now that we’ve established why Adobe Analytics is important, let’s look at some high-level dimension and metrics differences between Google Analytics and Adobe Analytics, and establish why the scope of dimensions and metrics is so critical to understanding any analytics set-up.
![]()
Adobe Analytics Entry Page vs. Google Analytics Landing Page
Looking at Adobe data, one of the first things you will likely notice is that sessions are now visits, and landing page is now entry page. As these are two extremely visible aspects of Google Analytics and Adobe Analytics, it’s important to note the high-level naming difference.
Google Analytics
![]()
Adobe Analytics
![]()
Google Analytics Goal Completions vs. Adobe Success Events
Another notable difference is GA goal completions vs. Adobe success events. For Google Analytics, each goal completion is counted once per session, where in Adobe, each success event counts each time the item occurs in a visit.
For example, if a conversion/success event in each platform is playing a video on the site, and you watch 5 videos in a single session/visit, in Google Analytics that will trigger only 1 video play goal completion, but in Adobe Analytics that will trigger 5 video play success events. When you think of Adobe success events, think of total events in Google Analytics.
Differences in Dimensions and Metrics Scope
An important aspect of all analytics is the scope of dimensions and metrics. Scope affects data collection, aggregation, and even the way you analyze data.
Ensure that you are matching the correct dimensions and metrics by scope when doing analysis, otherwise you run the risk of misleading your report stakeholders which leads to poor decisions based on this data.
So what are these scopes, and how do they differ between Google Analytics & Adobe?
Adobe Analytics and Google Analytics Hits:
- Definition: The building block upon which all other data is formed. Measures each individual interaction on the site (think pageviews, events).
- Google Analytics vs. Adobe Analytics: Standard across Google Analytics and Adobe.
- Main Takeaway Tip: You want to match hit dimensions to hit metrics (i.e. page with pageviews).
Adobe Analytics Visit / Google Analytics Session:
- Definition: Multiple hits make up a session/visit. The most heavily featured scope across both platforms.
- Google Analytics vs. Adobe Analytics: Different in naming across Google Analytics (session) & Adobe (visit).
- Main Takeaway Tip: These session/visit-level items can occur once in this scope, such as entry page, region, etc. Should match session/visit dimensions with session/visit metrics (i.e. entry page with visits and bounce rate, etc.)
Adobe Analytics Visitor / Google Analytics User:
- Definition: While multiple hits make up a session/visit, multiple sessions/visits make up a visitor/user.
- Google Analytics vs. Adobe Analytics: Different in naming across Google Analytics (user) & Adobe (visitor).
- Main Takeaway Tip: This typically is the most hidden scope in both platforms, but can provide powerful analysis, allowing you to be more audience-focused . Should match visitor/user dimensions with visitor/user metrics (i.e. new/repeat visitor with unique visitors).
See a more visual example of this breakdown below:
![]()
Now that you understand the scope of dimensions and metrics and how they differ between Adobe and Google Analytics, you are ready to jump into the Adobe interface. Let’s do it!
Navigation of the Adobe Analytics Interface
Once you’ve logged into the Adobe interface, you’ll be presented with the layout of report options (may differ slightly by account), which we will break down piece-by-piece:
![]()
The search reports and navigation element allows you to find what report you want, either through typing in the report name or navigating through the sections. Let’s see how we can find the entry page report with both options:
By typing in the report name itself, you’ll see which reports have this naming, and then can select the report that is more relevant to you. See below for the entry page report:
![]()
In this case, we don’t type the report name in, but rather click through the report structure to find it. You’ll notice that under the search option, this shows the same route that we use in the navigation structure to reach the report.
![]()
The top-nav allows you to easily navigate between Adobe’s interface. When you first log in to Adobe Analytics, this default to opening on the reporting tab. You could update in the future to land on the Workspace option as well. You could also not see the Workspace option if you don’t have access to this area (granted under your user-level rights).
Let’s break down each of the options available in this area.
- Workspace : This links to Adobe’s Analysis Workspace tool, which I’ll expand on in a future post. Some pretty amazing report, analysis, and visualization capabilities with this tool. Check on Benjamin Gaines session from the Adobe Analytics 2017 Summit for some cool insights here !
- Reports : Your current view, allowing you to pick among report options.
- Components : Allows you to manage segments, create calculated metrics, manage scheduled reports, etc.
- Tools : Allows you to access non-Workspace Adobe tools, such as Report Builder & Ad-Hoc Analysis . Report Builder is an add-on to Microsoft Excel, and is very useful for report automation. It functions in a similar manner as the Google Sheets Add-On does with the Google Analytics API . I’ll expand on Report Builder usage in a future post as well.
- Admin : Depending on your user access (either admin or user), this allows you to create new users, update Adobe report suite configuration settings, etc.
- Report Suite : On the far right of the screen (on the same level as the report search), you can change the Adobe report suite you are viewing (think Google Analytics account or property). For more advanced users, Adobe offers other types of report suites: Virtual and Global/Roll-Up being some of the major options.
Standard Adobe Analytics Report
Now that we know the basic interface, let’s explore a simple report (entry pages):
![]()
On the upper left-hand side, with the three icons, you have the options to (from top-to-bottom):
![]()
- View Reports : Navigate away from the current report
- Apply Segments : You can apply multiple segments at once (will find the overlap of all segments), and create and manage segments (which align to the dimension and metric scopes you choose!)
- Change Metrics : You can pick which metrics you have in the report (which should align to the dimension and metric scopes of the report). Let’s move our attention to the top-nav of the report itself (from left to right).
- Each of the symbols mean the following:
- “Entry Pages Report” – Name of the report
- The Star – Favorite the report to come back to for future reference (under your login)
- Cloud with Arrow – Download the report (Excel, PDF, etc.)
- Envelope – Send the report via email
- Book – Bookmark the report
- Speedometer – Add to an Adobe dashboard (less useful than Adobe’s other reporting options [Analysis Workspace being the main] in my opinion)
- Three Dots – contains more options, one of which is a quick link option (great for sharing reports with others – allow for them to come directly to the report upon login)
- The Cylinder – Which Report Suite the data is pulling from
- The Calendar – Allows for changing date ranges, and comparing dates (Adobe also allows you preset ranges – last month, last week, etc.). You can also create custom date ranges to fit your reporting needs
One last tip for the report layout: You can use these reports to drill down further based on what you have selected. This is located as shown below:
![]()
Want to see what channels drove visits to these entry pages? How about a breakdown by mobile device type? What can the regional data tell you about your paid targeting efforts? The possibilities are nearly endless. Go explore!
With these tools, you now how have the ability to:
- Understand how Adobe Analytics functions, why it is important, and how it differs from Google Analytics.
- Navigate the Adobe Analytics interface and basic reports.
Upcoming Adobe Analytics Tips
Now that you have this knowledge, if you have the opportunity, get in there and explore! What questions do you have based on what you’ve found? What are the hidden gems of Adobe Analytics that you use? Let me know in the comments!
However, truthfully, this is just the tip of the iceberg in relation to Adobe Analytics knowledge. To truly understand what Adobe offers, you’ll want to understand the following topics as well:
- eVars (custom conversion) vs. sProps (custom traffic) : How custom tracking with Adobe fundamentally works.
- Adobe’s Pathing & Fallout Tools : How Adobe’s PathFinder and Full Paths reports differ from Google Analytics’ pathing efforts, and how you can integrate pathing and fallout reporting into Analysis Workspace.
- Adobe Analysis Workspace : How Adobe’s main reporting and analysis tool is competing against Google Data Studio , and how it provides one of the most flexible and powerful interfaces of all major data analysis tools.
- Adobe Report Builder : How Adobe’s reporting automation tool stacks up against Google’s options, and how to most easily integrate it into your Excel reporting set-up.
Stay tuned for more information on these areas in future posts. If you’re ready for level two, check out The Definitive Guide to Adobe Analysis Workspace. Happy data digging!
![]()
Adobe — это многомиллиардная корпорация — в 2018 году их годовой доход достиг рекордных 9,03 миллиарда долларов (24% г/г), а их рыночная капитализация составляет 134,5 миллиарда долларов. Тем не менее, вы не можете сбрасывать со счетов умный маркетинг при оценке их успеха.
Вот краткая история бизнес-модели Adobe. Adobe — компания, занимающаяся разработкой программного обеспечения, которая создает мультимедийные и творческие программные продукты. Раньше они продавали программное обеспечение из коробки, и это было дорого — например, Photoshop обойдется вам в несколько сотен долларов.
В 2013 году Adobe перешла на модель SaaS, предлагая облачные решения за ежемесячную плату. Это дало возможность пользователям, которые не могли позволить себе выложить деньги за продукты, использовать их по более низкой цене в течение столь длительного времени, в котором эти продукты им нужны. И это сработало — всего за 2,5 года у Adobe было четыре миллиона новых подписчиков:
![]()
Так как же они достигли этого роста? Объединив свои проверенные знания о великолепном дизайне и UX с некоторыми умными приобретениями, которые помогли им превратить своих пользователей из простых потребителей в активных участников в процветающем сообществе креативщиков и бизнес-лидеров.
Анализ общей маркетинговой тактики Adobe
Дизайн, пользовательский опыт (UX) и приобретения, вероятно, не первые вещи, о которых вы думаете, обсуждая маркетинговые каналы. Тем не менее, Adobe использует их для создания сильного бренда и сообщества, которое помогло им расти со временем.
Красивый дизайн
Дизайн Adobe чистый, минималистичный и потому великолепный. Для компании, флагманским продуктом которой является программное обеспечение для дизайна, они отлично справляются со своей единой, эстетически приятной внешней составляющей. Просто взгляните на их домашнюю страницу :
![]()
Дизайн не перегружен и привлекателен, и в нем четко рассказывается, что представляет собой бренд .
Хороший пользовательский опыт
UX очень важен с точки зрения маркетинга. Эффективная маркетинговая воронка опирается на хороший опыт клиента, и компания Adobe знает это.
Изображение ниже с их главной страницы продукта Creative Cloud . Первое, что вы видите, это четкое, краткое предложение их продукта и CTA, чтобы начать бесплатную пробную версию. Преимущества и цены перечислены ниже, но пробное предложение является основным и центральным. Если я зайду на эту страницу, уже зная, что такое Creative Cloud, я сразу же нажму на это предложение.
![]()
Если я не знаю, что такое Creative Cloud, и зачем он мне нужен, прокрутка вниз страницы покажет мне все, что нужно знать, например, что включено в тарифный план:
![]()
Сколько это стоит:
![]()
Другими словами, мне не нужно искать информацию о следующем шаге или даже нажимать на отдельную страницу функций, чтобы принять решение о покупке.
Умное приобретение продукта
З десь мы много говорим о росте, основанном на продуктах, и это стратегия, в которой Adobe пошла ва-банк. В основном, рост за счет продукта — это создание или приобретение продукта и использование его в качестве маркетингового инструмента для вашего бизнеса.
Возможно, вы помните, что в 2005 году Adobe приобрела Macromedia, добавив в свой портфель такие инструменты, как Dreamweaver и Flash. С приобретением, компания смогла поглотить своего крупнейшего конкурента. Приобретения не являются новой стратегией для Adobe, но типы продуктов, которые они покупают, со временем эволюционировали.
![]()
Behance — это сайт-портфолио для креативщиков. Adobe приобрела его, чтобы добавить элемент сообщества в Creative Cloud, сделав его огромным центром для креативов и предоставив им инструменты и сервисы Adobe для улучшения и обмена своей работой.
![]()
Adobe Sign ( ранее EchoSign ) является одним из лидеров электронных подписей в Интернете. Интегрировав его в службы документооборота компании, Adobe смогла решить одну из основных проблем PDF-файлов того времени — тот факт, что вы не можете редактировать их электронным способом. Это была победа как для потребителей, так и для компании, которая затем смогла предложить интеграцию с другими платформами, такими как Dropbox и Salesforce.
SEO-игра Adobe
![]()
- Их рейтинг Ahrefs — 13, что означает, что они владеют 13-м по величине веб-сайтом в мире;
- У них есть 2 миллиона ссылающихся доменов, что означает 2 миллиона уникальных обратных ссылок;
- Они занимают почти 10 миллионов ключевых слов ;
- Их стоимость трафика составляет 48 миллионов долларов (поэтому, если бы вы покупали этот трафик в Google, вы платили бы 48 миллионов долларов в месяц за уровень трафика, который они имеют в настоящее время).
С точки зрения органичности, я также хотел бы посмотреть, как меняется их трафик с течением времени.
Посмотрите на график органического трафика ниже — он в стабильно держт позиции:
![]()
И если вы посмотрите на количество ключевых слов, по которым они ранжируются, они тоже сохраняют стабильность с плавным приростом:
![]()
Когда у вас такой масштабный веб-сайт, как Adobe, вы на самом деле не ожидаете, что ваш трафик будет так долго расти. Кроме того, в этом году в Google было внесено множество изменений в алгоритм, что дало всем удар по трафику. Стоимость трафика Adobe со временем немного снизилась, но все же осталась большой.
Теперь давайте посмотрим на их главные страницы, чтобы увидеть, что происходит с точки зрения SEO.
![]()
Это еще одна важная вещь, когда речь заходит о SEO — если вы сможете создавать больше запросов брендов, ваша компания станет более мощной.
Вот показатели для других свойств Adobe:
Итак, в конце концов, именно бренды, предлагающие отличные продукты и услуги, поднимутся на вершину, потому что они играют в долгосрочную игру. А Adobe, конечно, давно в игре. У них есть эта узнаваемость бренда, поэтому они получают все ссылки и упоминания.
Стратегия контент-маркетинга Adobe
Б лог Adobe действительно хорош. Там много советов и уроков:
![]()
Сообщества дизайнеров сотрудничают друг с другом. Так что предоставление пользователям хорошего контента и возможности делиться имеет большой смысл для Adobe как бренда.
Оптимизация коэффициента конверсии Adobe (CRO)
Воронка конверсии Adobe проста в обращении и действительно эффективна для перемещения пользователей по пути покупки. Их структура ценообразования (отдельные лица, бизнес, студенты и преподаватели) и то, что включено в каждый уровень, просты и хорошо продуманы:
![]()
Чтобы увеличить конверсию, Adobe также использует посты в блоге для умного продвижения продуктов. В начале многих постов у них даже есть призыв со множеством ссылок, разбросанных по всему посту:
![]()
И сильный CTA в конце:
![]()
Единственное, что, по моему мнению, отсутствует в Adobe, — это функция чата на главной странице (она есть в другом месте) и выход из всплывающих окон для людей, которые посещают, но не подписываются на бесплатную пробную версию или приобретают свой тариф.
Как Adobe тратит свои деньги
Используя Adbeat , вы можете посмотреть, как и сколько компания тратит на цифровую рекламу.
Ниже приведен обзор расходов на рекламу Adobe. Вы можете увидеть на графике, что их расходы со временем уменьшаются, возможно, с выпуском новых продуктов или специальных акций. Также вы можете видеть, что они увеличили свои расходы в апреле этого года:
![]()
Более полезно, чем смотреть на общие расходы Adobe, посмотреть, как именно они тратят свои деньги:
- 9% их расходов уходит на видео;
- 42% расходуют напрямую;
- 49% их расходов являются программными.
Это дает вам хорошее представление о том, как работает Adobe. Если вы немного углубитесь в графики, то увидите, на каких сайтах они размещают рекламу, в каких регионах рекламируют больше всего, а также в их наиболее эффективных объявлениях:
![]()
Когда вы посмотрите, как долго показывались объявления, вы можете понять, какие из них работали, а какие — нет. Например, с помощью приведенного выше объявления вы можете видеть, что оно показывалось довольно долго (с марта по август 2019 года), и что со временем расходы увеличились. Это говорит о том, что они, вероятно, были довольны ROI. Другие рекламные объявления, показывавшиеся в течение короткого периода времени, вероятно, не были настолько хорошими (или были привязаны к определенному событию или ограниченному продвижению).
Несмотря на то, что Adobe — огромная компания, вы можете видеть, что они постоянно тестируют и обращают внимание на мелкие детали. Если их реклама движется в неправильном направлении, они перенаправляют эти деньги на другие кампании.
Когда вы заглядываете за кулисы крупной, успешной компании, такой как Adobe, которая снова и снова изобретает себя, вы можете многое узнать о том, как продавать свои собственные продукты и услуги. Вы также можете использовать эти методы, чтобы изучить, что делают ваши конкуренты, чтобы вы могли убедиться, что ваша компаня делает это лучше.
Читайте также:
Step 2: Set up a Global Data Layer Object
Once Adobe Analytics is ready to receive data from Dynamic Yield, we will create a data layer object, via Dynamic Yield’s Custom Analytics integration.
The data layer object will be called dyGlobalObject , and will contain three elements:
The dyGlobalObject’s events array can be populated by different events, each carrying specific information we might want to record in Adobe:
To push information on variation impressions to data layer
![image1.jpg]()
Note that in our integration function above, in the following line:
We explicitly specify that each value of the list variable should be constructed as: [campaign_name].[experience_name].[variation_name]
You can change this definition, for example:
For example, if we wanted to record entity ids, separated by semicolons, we would edit the function to:
If you choose to use IDs instead of entity names, we recommend using Adobe’s SAINT classification to map them to the respective entity names. Note though that at the moment Dynamic Yield cannot provide convenient and systematic access to the metadata relating to these entity IDs for use with Adobe’s classification importer. IDs and respective metadata however can be found, for each variation, in the global object’s event array, and can be manually classified in Adobe. More on classification in paragraph Analyzing Dynamic Yield Campaigns in Adobe Analytics , below.
To push to data layer information on recommended products (Optional)
For recommendation campaigns, we can also surface information about the utilized algorithm and the recommended products.
After a few minutes, open the browser console on your website, where at least one Recommendation campaign is running, and type dyGlobalObject. You should see the events array contains a new event type: recommendation_impression
Note: in the following step of this guide we will only focus on the integration of variation impressions.
Step 3: Send a Call to Adobe Analytics
Once we have exposed the information we want to send to Adobe to the data layer object, we will send a call to Adobe Analytics. There are two options to do that:
Option 1: Sending a Call Via Dynamic Yield Once per Page
We will use a Dynamic Yield Custom Code campaign to populate the list variable from the data layer and then trigger an Adobe Analytics s.tl() call.
Option 2: Sending a call via your tag manager solution
This option leaves you the most flexibility to utilize the data layer object the way it best suits your implementation.
You can utilize the content of the dyGlobalObject’s listVar element as is, or build something analog working with the contents of each object in the events array.
You can also decide with which frequency and which way the call should be made: whether as a separate s.tl(), or together with the existing s.t() pageview.
Some setup examples:
Option Setup Pros Cons To trigger a call on every campaign impression Populate your list variable and bind the call on dyGlobalObject.event.event_type = impression Best accuracy Cost of calls To bundle calls together as an additional s.tl() call Use the content of dyGlobalObject.event.listVar or build your own analog solution, and trigger an s.tl() call when the page unloads. Good compromise Cost of additional s.t() call To bundle calls together on an existing call Use the content of dyGlobalObject.event.listVar or build your own analog solution No additional calls and costs Inaccuracy due to race conditions, if campaigns are served after the call is made. Validating The Integration
If you opted for integrating via Dynamic Yield, or via tag manager using the list variable, you can validate the integration is working as expected using the Adobe Experience Cloud Debugger, making sure the list variable is correctly populated. Below an example:
![image5.jpg]()
![image7.jpg]()
Analyzing Dynamic Yield Campaigns in Adobe Analytics
Once the setup is complete, you should see that your list variable is being populated in Adobe Analytics. We can approach analysis in two ways:
Using the list variable as-is
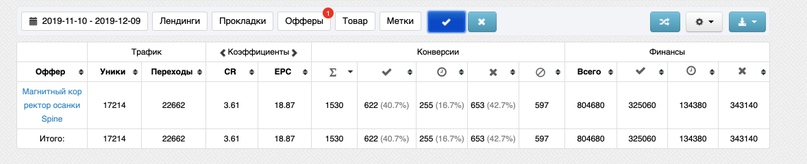
Let’s assume we have a Recommendation Campaign with two experiences and two variations per experience.
![image8.jpg]()
In Adobe Analytics, we can create a new freeform table and drag the “DY Integration” dimension into the view, alongside with Visits, Unique Visitors or any conversion metrics.
![image13.jpg]()
In this example, since we have two experiences containing two variations each, we should see four rows. If the number of combinations is high we might want to split each combination in their respective hierarchy of Campaign › Experience › Variation, for more convenient analysis.
Using Classification to Create Separate Dimensions for Campaigns, Experiences, and Variations.
Additionally to using the list variable as-is, you can use classification to further split each list value, separating on our chosen separator character.
For example, if each value of the list variable is set up as:
[campaign_name].[experience_name].[variation_name]We will be able to create three dimensions, by splitting on “.”:
![image6.jpg]()
Once our new dimensions are ready are built we can return to a workspace and utilize them:
![image9.jpg]()
Turning Off the Integration for a Specific Campaign
By default, the custom analytics platform integration is enabled for all campaigns. The integration can be turned off per campaign. This is done in the Advanced Settings of each campaign.
DMPG is an independently-owned digital experience enablement agency, certified in Google and Adobe Martech platforms, providing strategy and delivery services covering customer data platforms, marketing automation, cross-channel personalization, conversion rate optimization, digital analytics, and tag management.
Добрый вечер, ЦП! Меня зовут Владимир. Я менеджер продуктов в одной не очень большой компании. Меня интересует практика использования российскими компаниями системы аналитики Adobe Analytics.
Если есть эксперты в данном вопросе, хотелось бы увидеть обзор — плюсы, минусы, сравнение с другими системами аналитики («Яндекс.Метрика», Google Analytics, например). А также возможности для приобретения этой системы.
Отвечает Мила Анучина, менеджер мобильных приложений медиахолдинга Hearst Shkulev Media
Многие по старинке называют аналитику Adobe — Omniture, но с 2011 года официальное название Adobe Marketing Cloud, в него входят следующие продукты:
Если говорить конкретно об отчетах и аналитике интерактивных изданий в киоске, которые мы разбатываем на Adobe Digital Publishing Suite — мы ежедневно используем Adobe Analytics в работе:
Итого: Adobe Analytics в принципе не уступает Google Analytics, а местами более удобен, так как адаптирован под работу с продуктами Adobe.
Что касается возможностей приобретения системы — надо обращаться в Adobe, сами понимаете, суммы для крупного издательского дома и небольшой компании могут отличаться.
When you sign up for an Adobe Digital Publishing Suite subscription (Professional or Enterprise), it's necessary to enable Omniture analytics. When Omniture analytics are enabled, you can track user data in your digital publications.
This document describes how you can ensure that the analytics settings have been set up properly before you submit your app to the store.
This information only applies to Adobe Digital Publishing Suite Enterprise customers, or DPS Professional customers who have a separate Omniture account. The report suite is established using the Account Administration feature of the Digital Publishing Suite dashboard.
![Application Role Settings]()
If you have an Omniture account, it's necessary to know the "Company Name" used to log in to your Omniture account. Enter that, and the name of the report suite that you want, click Check Availability, and if it is not already in use, click Submit.
For Enterprise customers who don't have an Omniture account, omit the Company Name. Enter only the report suite name and click Check Availability. If it is not already in use, click Submit.
For Professional customers who don't have an Omniture account, leave both the Company Name and Report Suite fields blank and click Submit.
The report suite name you enter is converted into a report suite ID. Any spaces are converted to periods, and then prefixed with "dps." followed by "dl." or "sj." to indicate which data center they are created in. For example, the report suite name "my new report suite" produces a report suite ID "dps.sj.my.new.report.suite". There is a limit to the length of the report suite ID. So, you get an error if you enter a string that is more than 33 characters long, including spaces.
For more information about using the Account Administration tool, see Account Administration tool.
When you use the Viewer Builder to create your custom viewer app, the final step of the process ("Submit Build") displays Omniture information.
![]()
If you want to examine the settings in the distribution app before submission to Apple, do the following (Mac OS):
1. Unzip the distribution-viewer.zip file that Viewer Builder created.
Look for a file called viewer.app at the main level of the unzipped folder.
2. Control click viewer.app and choose Open Package Contents.
3. Find the file Omniture.plist in the newly opened window. Open it with a plist editor application, such as PList Edit pro.
The following image is from an application that does not have analytics enabled. Notice that the Omniture fields, accountID, trackerDC, trackerServer, and trackerSecureServer, have no values.
![]()
The following image is from an application that does have analytics enabled.
![]()
Note: Test data entered into your Analytics cannot be removed. However, you can screen it from your results by limiting the date range to after the app is live in the marketplace.
While most digital analysts understand Google Analytics, many can find Adobe Analytics to be a complete mystery. If you are one of those people, you’ve come to the right place. Let’s dig into Adobe Analytics and get you up to speed!
In this post, we’ll cover the following Adobe Analytics beginner topics: